Practical case: RC pushbutton debounce

RC pushbutton debounce prototype (Maker Style)

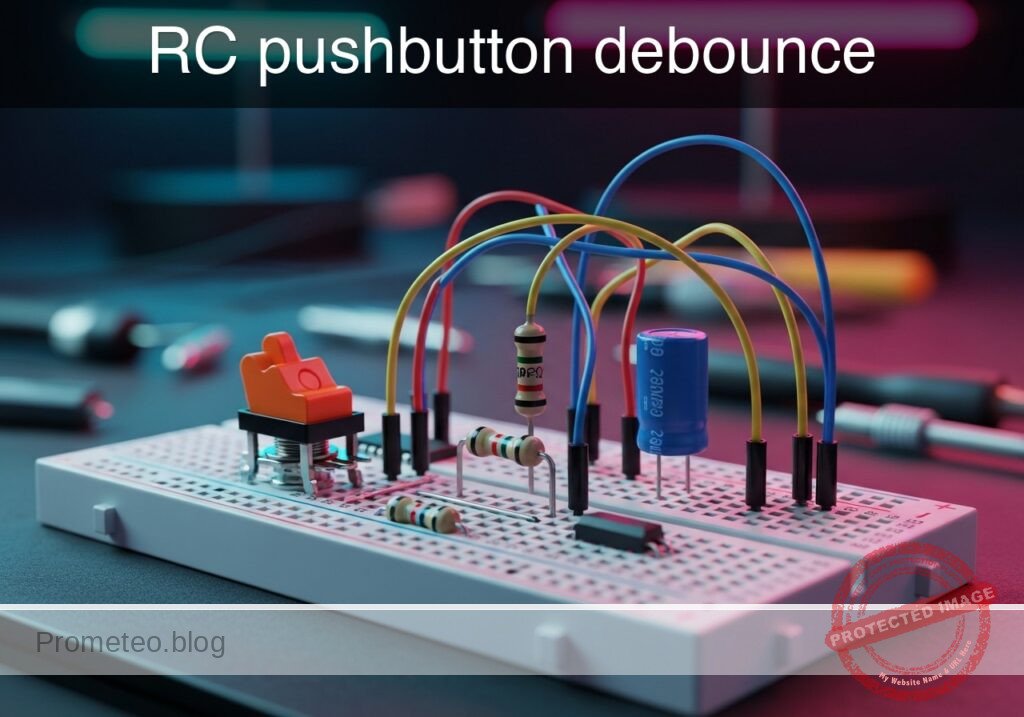
Level: Medium | Use a capacitor to mitigate mechanical noise when actuating a physical switch.

Objective and use case

In this practical case, you will build a passive RC (Resistor-Capacitor) network connected to a mechanical switch to filter out the high-frequency voltage spikes generated by contact bounce.

Why this is useful:
* Preventing multiple false triggers in digital counters or step sequences.
* Ensuring clean, singular interrupt signals for microcontrollers.
* Stabilizing input readings for memory elements like flip-flops and latches.
* Creating reliable and predictable user-interface buttons in embedded systems.

Expected outcome:
* The mechanical bounce, normally lasting 1–5 ms, is completely absorbed by the capacitor.
* The voltage at the switch node transitions smoothly rather than oscillating between logic levels.
* The charging time constant defines a clean transient voltage curve upon button release.
* Oscilloscope measurements will confirm the elimination of the bounce time in milliseconds.

Target audience and level: Intermediate electronics students and hobbyists learning about transient signals and physical switch characteristics.

Materials

  • V1: 5 V DC power supply
  • SW1: SPST momentary pushbutton switch, function: input trigger
  • R1: 10 kΩ resistor, function: pull-up for VSW
  • C1: 1 µF capacitor, function: debounce smoothing parallel to switch
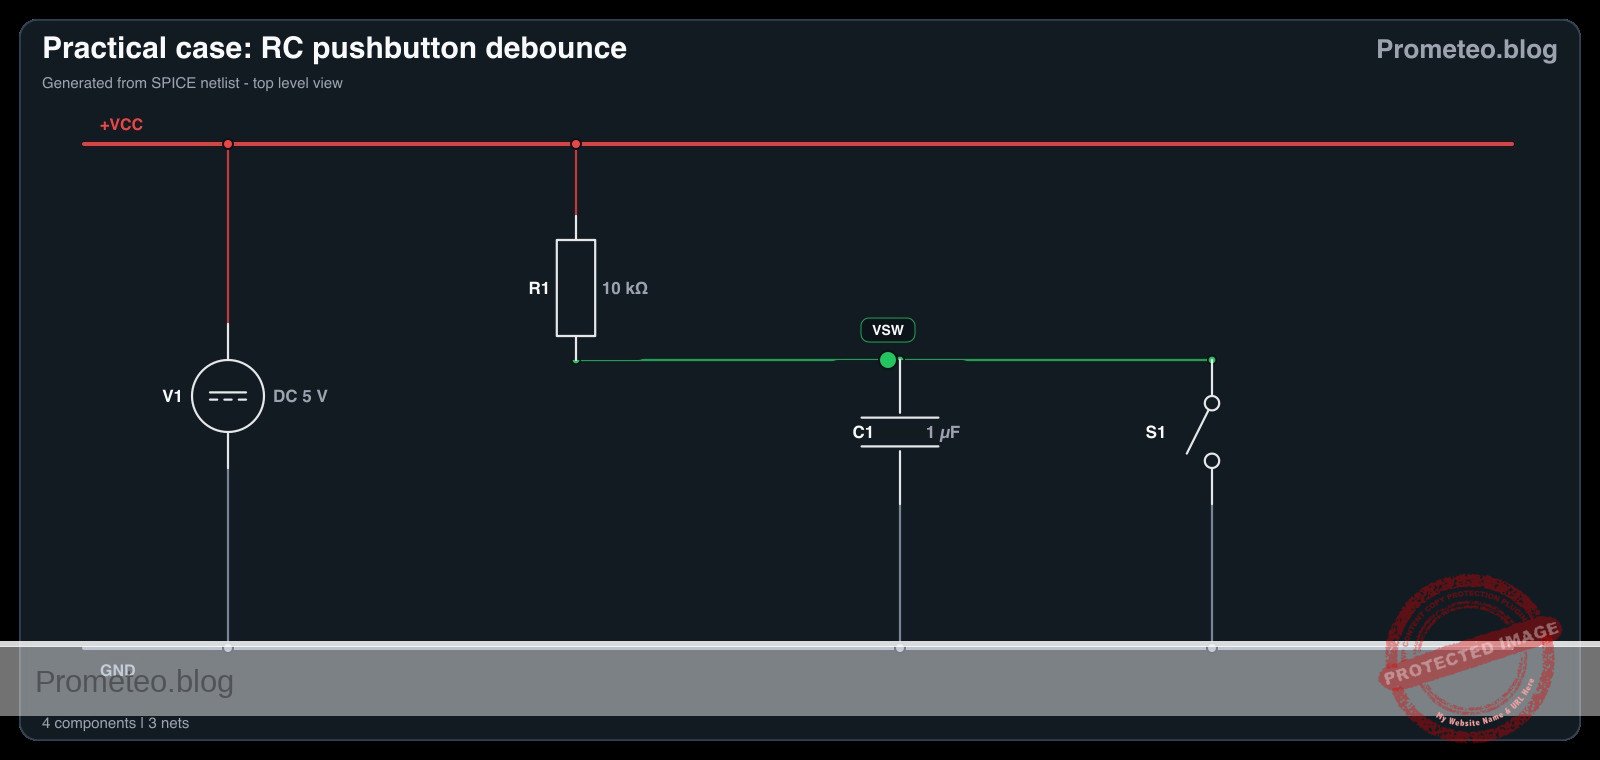
Wiring guide

  • V1: connects between node VCC and node 0 (GND).
  • R1: connects between node VCC and node VSW.
  • SW1: connects between node VSW and node 0.
  • C1: connects between node VSW and node 0.

Conceptual block diagram

Conceptual block diagram — 74HC08 Capacitor
Quick read: inputs → main block → output (actuator or measurement). This summarizes the ASCII schematic below.

Schematic

VCC (5 V) --> [ R1: 10 kΩ Pull-up ] --+--(Node VSW)--> [ Debounced Output ]
                                    |
                                    +--> [ SW1: Pushbutton ] --> GND
                                    |
                                    +--> [ C1: 1µF Capacitor ] --> GND
Electrical Schematic

Electrical diagram

Electrical diagram for case: RC pushbutton debounce
Generated from the validated SPICE netlist for this case.

🔒 This electrical diagram is premium. With the 7-day pass or the monthly membership you can unlock the complete didactic material and the print-ready PDF pack.🔓 See premium access plans

Measurements and tests

  1. Connect an oscilloscope probe to node VSW and the ground clip to node 0.
  2. Set the oscilloscope to trigger on a falling edge at a threshold of approximately 2.5 V. Set the time base to 2 ms/div to accurately capture the Bounce-Time-ms.
  3. Actuate SW1 (press the button) and observe the Transient-Voltage on the screen. The voltage should drop to 0 V smoothly without the rapid spikes characteristic of mechanical bounce.
  4. Release the switch and observe the rising edge. Measure the time it takes for the voltage to reach 3.15 V (approx. 63.2% of 5 V). This represents one RC time constant (\tau = R × C), which should theoretically be 10 ms.
  5. Temporarily remove C1 from the circuit, press the switch again, and observe the raw mechanical bounce to compare the before-and-after transient signals. Reinsert C1 once complete.

SPICE netlist and simulation

Reference SPICE Netlist (ngspice) — excerptFull SPICE netlist (ngspice)

* Practical case: RC pushbutton debounce
.width out=256

* Main DC Power Supply
V1 VCC 0 DC 5

* Pull-up Resistor
R1 VCC VSW 10k

* Debounce Smoothing Capacitor
C1 VSW 0 1u

* Pushbutton SW1 modeled as a voltage-controlled switch
* Connects VSW to 0 (GND) when the control voltage is high
S1 VSW 0 ctrl 0 switch_model
.model switch_model SW(Vt=2.5 Ron=1 Roff=100Meg)

* Control pulse simulating the user pressing the button
* Presses the button at 5ms, holds for 20ms, repeats every 50ms
Vctrl ctrl 0 PULSE(0 5 5m 1u 1u 20m 50m)
* ... (truncated in public view) ...

Copy this content into a .cir file and run with ngspice.

🔒 Part of this section is premium. With the 7-day pass or the monthly membership you can access the full content (materials, wiring, detailed build, validation, troubleshooting, variants and checklist) and download the complete print-ready PDF pack.

* Practical case: RC pushbutton debounce
.width out=256

* Main DC Power Supply
V1 VCC 0 DC 5

* Pull-up Resistor
R1 VCC VSW 10k

* Debounce Smoothing Capacitor
C1 VSW 0 1u

* Pushbutton SW1 modeled as a voltage-controlled switch
* Connects VSW to 0 (GND) when the control voltage is high
S1 VSW 0 ctrl 0 switch_model
.model switch_model SW(Vt=2.5 Ron=1 Roff=100Meg)

* Control pulse simulating the user pressing the button
* Presses the button at 5ms, holds for 20ms, repeats every 50ms
Vctrl ctrl 0 PULSE(0 5 5m 1u 1u 20m 50m)

* Analysis directives
.op
.tran 100u 100m

* CRITICAL: Print input (button press) and output (debounced signal)
.print tran V(ctrl) V(VSW)

.end

Simulation Results (Transient Analysis)

Simulation Results (Transient Analysis)
Show raw data table (1134 rows)
Index   time            v(ctrl)         v(vsw)
0	0.000000e+00	0.000000e+00	4.999500e+00
1	1.000000e-06	0.000000e+00	4.999500e+00
2	2.000000e-06	0.000000e+00	4.999500e+00
3	4.000000e-06	0.000000e+00	4.999500e+00
4	8.000000e-06	0.000000e+00	4.999500e+00
5	1.600000e-05	0.000000e+00	4.999500e+00
6	3.200000e-05	0.000000e+00	4.999500e+00
7	6.400000e-05	0.000000e+00	4.999500e+00
8	1.280000e-04	0.000000e+00	4.999500e+00
9	2.280000e-04	0.000000e+00	4.999500e+00
10	3.280000e-04	0.000000e+00	4.999500e+00
11	4.280000e-04	0.000000e+00	4.999500e+00
12	5.280000e-04	0.000000e+00	4.999500e+00
13	6.280000e-04	0.000000e+00	4.999500e+00
14	7.280000e-04	0.000000e+00	4.999500e+00
15	8.280000e-04	0.000000e+00	4.999500e+00
16	9.280000e-04	0.000000e+00	4.999500e+00
17	1.028000e-03	0.000000e+00	4.999500e+00
18	1.128000e-03	0.000000e+00	4.999500e+00
19	1.228000e-03	0.000000e+00	4.999500e+00
20	1.328000e-03	0.000000e+00	4.999500e+00
21	1.428000e-03	0.000000e+00	4.999500e+00
22	1.528000e-03	0.000000e+00	4.999500e+00
23	1.628000e-03	0.000000e+00	4.999500e+00
... (1110 more rows) ...

Common mistakes and how to avoid them

  • Choosing a capacitor value that is too large: Using a 100 µF capacitor with a 10 kΩ pull-up results in a 1-second time constant, causing a sluggish button response. Solution: Keep C1 between 100 nF and 1 µF for standard 10 kΩ pull-up resistors.
  • Missing the pull-up resistor: Without R1, node VSW will float unpredictably when the switch is open. Solution: Always ensure R1 is securely connected between VCC and the switch node.
  • Feeding the slow RC signal directly into standard digital logic: Standard logic gates (like a basic 74HC08) can oscillate if fed a slowly rising voltage. Solution: Use this circuit to understand the RC transient, but for real digital inputs, feed the debounced signal through a Schmitt Trigger IC to square up the edges.

Troubleshooting

  • Symptom: The voltage at node VSW remains constantly at 0 V.
  • Cause: The switch is physically stuck closed, or the capacitor C1 is shorted.
  • Fix: Check the switch continuity with a multimeter and replace C1 if defective.
  • Symptom: The voltage at node VSW stays constantly at 5 V even when pressed.
  • Cause: SW1 is not properly connected to node 0 (Ground).
  • Fix: Verify the ground connection on the lower terminal of the switch.
  • Symptom: Switch bounce is still visible on the rising edge.
  • Cause: The RC time constant is too short compared to the mechanical bounce duration of that specific switch.
  • Fix: Increase the value of C1 (e.g., from 0.1 µF to 1 µF).
  • Symptom: The switch contacts fail or degrade after repeated presses.
  • Cause: The capacitor dumps its charge instantly through the switch contacts, causing high inrush current.
  • Fix: For long-term reliability, add a small 100 Ω resistor in series with the switch to limit the discharge current.

Possible improvements and extensions

  • Add a Schmitt Trigger buffer: Route the VSW node through a Schmitt Trigger inverter (such as the 74HC14) to convert the exponential RC charging curve into a crisp, bounce-free digital logic pulse.
  • Hardware vs Software Debounce comparison: Keep this hardware RC circuit on one button, and wire a raw button to a microcontroller. Implement a software debounce algorithm on the raw button and compare the resource usage and reliability of both methods.

More Practical Cases on Prometeo.blog

Find this product and/or books on this topic on Amazon

Go to Amazon

As an Amazon Associate, I earn from qualifying purchases. If you buy through this link, you help keep this project running.

Quick Quiz

Question 1: What is the primary purpose of the RC network described in the article?


Question 2: How long does mechanical bounce typically last according to the context?


Question 3: Which of the following is a direct benefit of using this RC network?


Question 4: What happens to the voltage at the switch node when the RC network is applied?


Question 5: What defines the clean transient voltage curve upon button release?


Question 6: What instrument is mentioned to confirm the elimination of the bounce time?


Question 7: What type of components make up the passive network used for debouncing in this case?


Question 8: Why is debouncing important for microcontrollers?


Question 9: What effect does the capacitor have on the mechanical bounce?


Question 10: For which type of memory elements does this circuit stabilize input readings?


Carlos Núñez Zorrilla
Electronics & Computer Engineer

Telecommunications Electronics Engineer and Computer Engineer (official degrees in Spain).

Follow me:


Practical case: Astable oscillator with NE555

Astable oscillator with NE555 prototype (Maker Style)

Level: Medium – Configure a capacitor in an NE555 circuit to control the oscillation frequency.

Objective and use case

In this practical case, you will build an astable multivibrator circuit using the classic NE555 timer. The core focus is to understand how the charging and discharging of a timing capacitor regulates the frequency and duty cycle of the output signal.

Why it is useful:
* Clock generation: Generates steady clock pulses for sequential digital circuits.
* Warning flashers: Drives LEDs or lamps in hazard and warning systems.
* Audio tone generation: Produces audible frequencies for buzzers, alarms, and electronic metronomes.
* PWM foundations: Demonstrates the underlying principles needed to generate Pulse Width Modulation signals.

Expected outcome:
* The circuit will generate a continuous square wave without requiring any external trigger.
* The voltage across the timing capacitor will continuously charge and discharge between 1/3 and 2/3 of the supply voltage.
* An LED connected to the output will flash continuously at a predictable frequency of approximately 1.4 Hz.
* The frequency and duty cycle will closely match the calculated values based on the chosen RC network.

Target audience: Intermediate electronics students learning mixed-signal timing circuits and capacitor behavior.

Materials

  • U1: NE555 timer IC, function: oscillator core
  • R1: 10 kΩ resistor, function: timing resistor for charge cycle
  • R2: 47 kΩ resistor, function: timing resistor for charge and discharge cycles
  • C1: 10 µF electrolytic capacitor, function: primary timing capacitor determining frequency
  • C2: 10 nF ceramic capacitor, function: control voltage noise decoupling
  • R3: 330 Ω resistor, function: LED current limiting
  • D1: red LED, function: visual frequency indicator
  • V1: 5 V DC supply, function: circuit power

Wiring guide

  • V1: Connects between node VCC (positive) and node 0 (GND).
  • U1:
  • Pin 8 (VCC) connects to node VCC.
  • Pin 1 (GND) connects to node 0.
  • Pin 4 (RESET) connects to node VCC.
  • Pin 2 (TRIG) and Pin 6 (THRES) are tied together to form node TH_TR.
  • Pin 7 (DISCH) connects to node DISCH.
  • Pin 5 (CTRL) connects to node CV.
  • Pin 3 (OUT) connects to node VOUT.
  • R1: Connects between node VCC and node DISCH.
  • R2: Connects between node DISCH and node TH_TR.
  • C1: Connects between node TH_TR (positive lead) and node 0 (negative lead).
  • C2: Connects between node CV and node 0.
  • R3: Connects between node VOUT and node LED_A.
  • D1: Connects between node LED_A (anode) and node 0 (cathode).

Conceptual block diagram

Conceptual block diagram — NE555 NE555 Timer Oscillator
Quick read: inputs → main block → output (actuator or measurement). This summarizes the ASCII schematic below.

Schematic

[ V1: 5 V DC ] --(PWR/RST: Pins 8,4) ------------------> [                 ]
                                                        [                 ] --(VOUT: Pin 3)--> [ R3: 330 Ω ] --(LED_A)--> [ D1: Red LED ] --> GND
[ V1: 5 V DC ] --> [ R1: 10 kΩ ] --(DISCH: Pin 7) ------> [ U1: NE555 Timer ]
                       |                                [ Oscillator Core ] --(CV: Pin 5)----> [ C2: 10nF ] --> GND
                       +--> [ R2: 47 kΩ ] --(TH_TR: 2,6)>[                 ]
                                  |                     [   (Pin 1: GND)  ]
                                  +--> [ C1: 10µF ] --> GND       |
                                                                 GND
Electrical Schematic

Electrical diagram

Electrical diagram for case: Astable oscillator with NE555
Generated from the validated SPICE netlist for this case.

🔒 This electrical diagram is premium. With the 7-day pass or the monthly membership you can unlock the complete didactic material and the print-ready PDF pack.🔓 See premium access plans

Measurements and tests

  1. V-capacitor-waveform validation: Connect an oscilloscope probe to node TH_TR and the ground lead to node 0. You should observe a continuous, triangular-like waveform that charges up to roughly 3.33 V (2/3 VCC) and discharges down to roughly 1.66 V (1/3 VCC).
  2. Frequency-Hz measurement: Connect the oscilloscope or a multimeter with frequency measurement capabilities to node VOUT. You should read a frequency of approximately 1.38 Hz, generating a clear, visible flashing on the LED.
  3. Duty cycle verification: Measure the high time versus the low time on node VOUT. Because the capacitor charges through both R1 and R2 but discharges only through R2, the high time will be slightly longer than the low time (duty cycle > 50%).
  4. Supply voltage independence test: Temporarily increase V1 from 5 V to 9 V. Observe the frequency at VOUT. The frequency should remain virtually unchanged because the internal comparator thresholds scale proportionally with the supply voltage.

SPICE netlist and simulation

Reference SPICE Netlist (ngspice) — excerptFull SPICE netlist (ngspice)

* Practical case: Astable oscillator with NE555
.width out=256

* Power Supply
V1 VCC 0 DC 5

* NE555 Timer IC Subcircuit Instance
* Pins: GND TRIG OUT RESET CTRL THRES DISCH VCC_PIN
XU1 0 TH_TR VOUT VCC CV TH_TR DISCH VCC NE555

* Timing Components
R1 VCC DISCH 10k
R2 DISCH TH_TR 47k
C1 TH_TR 0 10u
C2 CV 0 10n

* Output Load (LED)
R3 VOUT LED_A 330
D1 LED_A 0 DLED

* ... (truncated in public view) ...

Copy this content into a .cir file and run with ngspice.

🔒 Part of this section is premium. With the 7-day pass or the monthly membership you can access the full content (materials, wiring, detailed build, validation, troubleshooting, variants and checklist) and download the complete print-ready PDF pack.

* Practical case: Astable oscillator with NE555
.width out=256

* Power Supply
V1 VCC 0 DC 5

* NE555 Timer IC Subcircuit Instance
* Pins: GND TRIG OUT RESET CTRL THRES DISCH VCC_PIN
XU1 0 TH_TR VOUT VCC CV TH_TR DISCH VCC NE555

* Timing Components
R1 VCC DISCH 10k
R2 DISCH TH_TR 47k
C1 TH_TR 0 10u
C2 CV 0 10n

* Output Load (LED)
R3 VOUT LED_A 330
D1 LED_A 0 DLED

* Models
.MODEL DLED D(IS=1e-19 N=1.6 RS=10 BV=5 IBV=10u)

* Behavioral NE555 Subcircuit
.SUBCKT NE555 GND TRIG OUT RESET CTRL THRES DISCH VCC_PIN
* Internal voltage divider (3 x 5k resistors)
R1 VCC_PIN CTRL 5k
R2 CTRL N1 5k
R3 N1 GND 5k

* Smooth comparators for threshold, trigger, and reset
B_COMP_TH COMP_TH GND V=0.5*(1+tanh(100*(V(THRES,GND)-V(CTRL,GND))))
B_COMP_TR COMP_TR GND V=0.5*(1+tanh(100*(V(N1,GND)-V(TRIG,GND))))
B_COMP_RST COMP_RST GND V=0.5*(1+tanh(100*(0.7-V(RESET,GND))))

* SR Latch (Integrator with positive feedback for infinite hold time)
B_LATCH GND LATCH I=V(COMP_TR,GND) - V(COMP_TH,GND) - 5*V(COMP_RST,GND) + (V(LATCH,GND)>0.5 ? 0.1 : -0.1)
C_LATCH LATCH GND 1n
R_LATCH LATCH GND 100Meg

* Latch Voltage Clamps (Clamps V(LATCH) between ~0V and ~1V)
D1 GND LATCH D_CLAMP
V_CLAMP V_CLAMP_NODE GND 1
D2 LATCH V_CLAMP_NODE D_CLAMP
.model D_CLAMP D(N=0.01 RS=1)

* Output Driver Stage
B_OUT OUT_INT GND V=V(LATCH,GND)>0.5 ? V(VCC_PIN,GND) : 0.1
R_OUT OUT_INT OUT 10

* Open-Collector Discharge Transistor (Modeled as a Switch)
B_DISCH_CTRL DISCH_CTRL GND V=V(LATCH,GND)<0.5 ? 1 : 0
S_DISCH DISCH GND DISCH_CTRL GND SW_DISCH
.model SW_DISCH SW(VT=0.5 RON=15 ROFF=100Meg)
.ENDS

* Force initial condition on timing capacitor to ensure guaranteed oscillator startup
.ic V(TH_TR)=0

* Simulation Commands
.op
.tran 1m 3
.print tran V(VOUT) V(TH_TR) V(DISCH) V(LED_A) V(CV)

Simulation Results (Transient Analysis)

Simulation Results (Transient Analysis)
Show raw data table (3013 rows)
Index   time            v(vout)         v(th_tr)        v(disch)        v(led_a)        v(cv)
0	0.000000e+00	4.903386e+00	0.000000e+00	4.122467e+00	1.715117e+00	3.333333e+00
1	1.000000e-05	4.903386e+00	8.771053e-05	4.122482e+00	1.715117e+00	3.333333e+00
2	2.000000e-05	4.903386e+00	1.754195e-04	4.122498e+00	1.715117e+00	3.333333e+00
3	4.000000e-05	4.903386e+00	3.508344e-04	4.122529e+00	1.715117e+00	3.333333e+00
4	8.000000e-05	4.903386e+00	7.016457e-04	4.122590e+00	1.715117e+00	3.333333e+00
5	1.600000e-04	4.903386e+00	1.403195e-03	4.122713e+00	1.715117e+00	3.333333e+00
6	3.200000e-04	4.903386e+00	2.805997e-03	4.122959e+00	1.715117e+00	3.333333e+00
7	6.400000e-04	4.903386e+00	5.610420e-03	4.123451e+00	1.715117e+00	3.333333e+00
8	1.280000e-03	4.903386e+00	1.121455e-02	4.124434e+00	1.715117e+00	3.333333e+00
9	2.280000e-03	4.903386e+00	1.995841e-02	4.125968e+00	1.715117e+00	3.333333e+00
10	3.280000e-03	4.903386e+00	2.868694e-02	4.127499e+00	1.715117e+00	3.333333e+00
11	4.280000e-03	4.903386e+00	3.740018e-02	4.129028e+00	1.715117e+00	3.333333e+00
12	5.280000e-03	4.903386e+00	4.609814e-02	4.130554e+00	1.715117e+00	3.333333e+00
13	6.280000e-03	4.903386e+00	5.478085e-02	4.132077e+00	1.715117e+00	3.333333e+00
14	7.280000e-03	4.903386e+00	6.344835e-02	4.133597e+00	1.715117e+00	3.333333e+00
15	8.280000e-03	4.903386e+00	7.210065e-02	4.135115e+00	1.715117e+00	3.333333e+00
16	9.280000e-03	4.903386e+00	8.073778e-02	4.136630e+00	1.715117e+00	3.333333e+00
17	1.028000e-02	4.903386e+00	8.935978e-02	4.138143e+00	1.715117e+00	3.333333e+00
18	1.128000e-02	4.903386e+00	9.796666e-02	4.139653e+00	1.715117e+00	3.333333e+00
19	1.228000e-02	4.903386e+00	1.065585e-01	4.141160e+00	1.715117e+00	3.333333e+00
20	1.328000e-02	4.903386e+00	1.151352e-01	4.142665e+00	1.715117e+00	3.333333e+00
21	1.428000e-02	4.903386e+00	1.236969e-01	4.144166e+00	1.715117e+00	3.333333e+00
22	1.528000e-02	4.903386e+00	1.322436e-01	4.145666e+00	1.715117e+00	3.333333e+00
23	1.628000e-02	4.903386e+00	1.407753e-01	4.147162e+00	1.715117e+00	3.333333e+00
... (2989 more rows) ...

Common mistakes and how to avoid them

  1. Electrolytic capacitor connected backwards: C1 is an electrolytic capacitor, meaning it is polarized. If installed backwards, it will leak current, preventing it from reaching the 2/3 VCC threshold, and the circuit will freeze. Always ensure the negative stripe is connected to ground (node 0).
  2. Using too small a value for R1: If R1 is too small (e.g., less than 1 kΩ), excessive current will flow into Pin 7 during the discharge cycle. This can overheat and permanently damage the internal discharge transistor of the NE555. Always keep R1 at a safe value (1 kΩ or higher).
  3. Leaving the RESET pin floating: Pin 4 is an active-low reset. If left unconnected, ambient electrical noise can randomly reset the timer, causing erratic oscillation or stopping the circuit entirely. Always tie Pin 4 to VCC when the reset function is not needed.

Troubleshooting

  • Symptom: The LED stays solidly ON or OFF and never blinks.
    • Cause: The timing capacitor C1 is shorted, or the wiring to Pins 2 and 6 is incomplete, preventing the trigger/threshold voltage from changing.
    • Fix: Verify that C1 is firmly seated and strictly connected between TH_TR and 0. Ensure Pins 2 and 6 are bridged.
  • Symptom: The LED appears to be continuously ON but slightly dimmer than usual.
    • Cause: The oscillation frequency is too high for the human eye to perceive the blinking (typically > 50 Hz). This happens if the RC values are too small.
    • Fix: Check the value of C1. If you accidentally used a 10 nF capacitor instead of a 10 µF capacitor, the frequency will be in the kilohertz range. Swap it for the correct 10 µF value.
  • Symptom: The oscillation frequency is highly unstable or erratic.
    • Cause: Electrical noise is interfering with the internal voltage divider of the NE555.
    • Fix: Ensure C2 (10 nF) is properly connected to Pin 5 (CTRL) and ground. Also, verify that your power supply V1 is stable.

Possible improvements and extensions

  1. Variable frequency control: Replace R2 with a 100 kΩ potentiometer in series with a 1 kΩ fixed resistor. This allows you to manually adjust the discharge rate and, consequently, dial in the oscillation frequency on the fly.
  2. Audio oscillator conversion: Swap C1 for a 100 nF ceramic capacitor and replace the LED/R3 network with a small 8 Ω speaker in series with a 100 µF coupling capacitor. This will shift the oscillation into the audible spectrum, creating a custom tone generator.

More Practical Cases on Prometeo.blog

Find this product and/or books on this topic on Amazon

Go to Amazon

As an Amazon Associate, I earn from qualifying purchases. If you buy through this link, you help keep this project running.

Quick Quiz

Question 1: What is the primary objective of the circuit described in the text?


Question 2: Between what two voltage levels does the timing capacitor continuously charge and discharge?


Question 3: What is the expected flashing frequency of the LED connected to the output?


Question 4: What type of signal does the circuit generate without requiring an external trigger?


Question 5: Which of the following is listed as a use case for this NE555 circuit?


Question 6: What role does the timing capacitor play in this NE555 circuit?


Question 7: How does the circuit behave in terms of triggering?


Question 8: What foundational principle does this astable multivibrator circuit demonstrate?


Question 9: In hazard and warning systems, what is the NE555 circuit used to drive?


Question 10: What does the circuit generate for sequential digital circuits?


Carlos Núñez Zorrilla
Electronics & Computer Engineer

Telecommunications Electronics Engineer and Computer Engineer (official degrees in Spain).

Follow me:


Practical case: Linear supply voltage smoothing

Linear supply voltage smoothing prototype (Maker Style)

Level: Medium. Compare voltage ripple in a basic power supply by varying filtering capacitance under load.

Objective and use case

In this practical case, you will build a Full-Wave Bridge Rectifier circuit coupled with a selectable filter capacitor bank and a resistive load. You will analyze how the value of the filter capacitor affects the quality of the DC output by measuring the «ripple» voltage superimposed on the DC signal.

  • Audio Power Supplies: Reducing 50/60 Hz hum in amplifiers and speakers.
  • Digital Logic Power: Ensuring stable voltage levels to prevent microcontroller resets or erratic behavior.
  • Sensor Conditioning: Providing clean DC power to analog sensors for accurate readings.
  • Battery Charging: Smoothing the charging current to prolong battery life.

Expected outcome:
* Waveform Transformation: Visual observation of AC sine wave converting to pulsing DC, then to smooth DC.
* Ripple Voltage (Vripple): A high peak-to-peak ripple voltage (> 5 V) with a small capacitor (10 µF).
* Smoothing Effect: A significantly reduced ripple voltage (< 0.5 V) when switching to a large capacitor (470 µF).
* Target Audience: Intermediate electronics students and hobbyists familiar with AC/DC concepts.

Materials

  • V1: 12 V (RMS) AC transformer secondary or AC function generator (60 Hz), function: AC power source.
  • D1: 1N4007 Diode, function: Bridge rectifier top-left.
  • D2: 1N4007 Diode, function: Bridge rectifier top-right.
  • D3: 1N4007 Diode, function: Bridge rectifier bottom-left.
  • D4: 1N4007 Diode, function: Bridge rectifier bottom-right.
  • R1: 220 Ω resistor (2 Watt rating recommended), function: Static Load.
  • C1: 10 µF electrolytic capacitor (25 V or higher), function: Low-value filter.
  • C2: 470 µF electrolytic capacitor (25 V or higher), function: High-value filter.
  • S1: SPDT Switch or jumper wire, function: Selects between C1 and C2.
  • Test Equipment: Oscilloscope (preferred) or Multimeter with AC/DC measurement capabilities.

Wiring guide

Construct the circuit using the following node connections. Ensure electrolytic capacitors are connected with correct polarity (Positive terminal to V_DC, Negative terminal to 0 / GND).

  • V1 (Source): Connects between node AC_L and node AC_N.
  • D1: Anode connects to AC_L, Cathode connects to V_DC.
  • D2: Anode connects to AC_N, Cathode connects to V_DC.
  • D3: Anode connects to 0 (GND), Cathode connects to AC_L.
  • D4: Anode connects to 0 (GND), Cathode connects to AC_N.
  • R1 (Load): Connects between node V_DC and node 0 (GND).
  • C1 (Test Case A): Positive terminal to V_DC, Negative terminal to 0 (GND).
  • C2 (Test Case B): Positive terminal to V_DC, Negative terminal to 0 (GND) (Replace C1 with C2 for second test).

Conceptual block diagram

Conceptual block diagram — LM7812 Linear Power Supply Smoothing
Quick read: inputs → main block → output (actuator or measurement). This summarizes the ASCII schematic below.

Schematic

[ INPUT SOURCE ]              [ RECTIFICATION ]                [ FILTER STAGE ]                 [ OUTPUT LOAD ]

                                                                  +-> [ Capacitor C1 ] -+
                                                                  |     (10 uF)         |
 [ AC Source V1 ] --(12 V AC)--> [ Bridge Rectifier ] --(Raw DC)-->+                     +--(V_DC)--> [ Load Resistor R1 ]
    (12 V RMS)                   [  D1, D2, D3, D4  ]              |   [ Switch S1  ]    |            (220 Ohm)
                                                                  +-> [ Capacitor C2 ] -+                |
                                                                        (470 uF)                         |
                                                                                                         |
                                                                                                         v
                                                                                                  [ Oscilloscope ]
                                                                                                  (Measure Ripple)
Schematic (ASCII)

Electrical diagram

Electrical diagram for case: Linear supply voltage smoothing
Generated from the validated SPICE netlist for this case.

🔒 This electrical diagram is premium. With the 7-day pass or the monthly membership you can unlock the complete didactic material and the print-ready PDF pack.🔓 See premium access plans

Measurements and tests

Follow these steps to validate the smoothing efficiency:

  1. Baseline (No Capacitor): Temporarily remove any capacitor. Measure V_DC with an oscilloscope. You should see a full-wave rectified signal (humps going to 0 V) at 120 Hz (or 100 Hz).
  2. Small Capacitor Test (C1 = 10 µ F):
    • Insert $C1$.
    • Measure the peak voltage (Vpeak) and the minimum valley voltage (Vmin).
    • Calculate Ripple: Vripple = Vpeak – Vmin.
    • Expectation: Significant sawtooth ripple (fast discharge).
  3. Large Capacitor Test (C2 = 470 µ F):
    • Replace $C1$ with $C2$.
    • Measure Vpeak and Vmin again.
    • Expectation: The DC line is much flatter; Vmin stays close to Vpeak.
  4. DC Average: Switch your multimeter to DC Volts. Compare the reading of $C1$ vs $C2$. The average voltage with $C2$ will be higher because the capacitor maintains the charge longer.

SPICE netlist and simulation

Reference SPICE Netlist (ngspice) — excerptFull SPICE netlist (ngspice)

* Linear supply voltage smoothing
*
* Description:
* This netlist simulates a full-wave bridge rectifier power supply with a 
* selectable smoothing capacitor.
* - 0ms to 100ms: C1 (10uF) is connected (High Ripple case).
* - 100ms to 200ms: C2 (470uF) is connected (Low Ripple case), simulating
*   switch S1 toggling.
*
* Connections:
* V1 (AC Source) -> Nodes AC_L, AC_N
* D1-D4 (Bridge) -> Nodes AC_L, AC_N, V_DC, 0 (GND)
* R1 (Load)      -> Nodes V_DC, 0
* S1 (Switch)    -> Modeled via S_C1 and S_C2 connecting V_DC to C1/C2
*
* -----------------------------------------------------------------------------

* --- AC Power Source ---
* 12V RMS AC, 60Hz. 
* Peak Voltage = 12 * sqrt(2) = 16.97 V
* ... (truncated in public view) ...

Copy this content into a .cir file and run with ngspice.

🔒 Part of this section is premium. With the 7-day pass or the monthly membership you can access the full content (materials, wiring, detailed build, validation, troubleshooting, variants and checklist) and download the complete print-ready PDF pack.

* Linear supply voltage smoothing
*
* Description:
* This netlist simulates a full-wave bridge rectifier power supply with a 
* selectable smoothing capacitor.
* - 0ms to 100ms: C1 (10uF) is connected (High Ripple case).
* - 100ms to 200ms: C2 (470uF) is connected (Low Ripple case), simulating
*   switch S1 toggling.
*
* Connections:
* V1 (AC Source) -> Nodes AC_L, AC_N
* D1-D4 (Bridge) -> Nodes AC_L, AC_N, V_DC, 0 (GND)
* R1 (Load)      -> Nodes V_DC, 0
* S1 (Switch)    -> Modeled via S_C1 and S_C2 connecting V_DC to C1/C2
*
* -----------------------------------------------------------------------------

* --- AC Power Source ---
* 12V RMS AC, 60Hz. 
* Peak Voltage = 12 * sqrt(2) = 16.97 V
V1 AC_L AC_N SIN(0 16.97 60)

* --- Bridge Rectifier (1N4007) ---
* D1: Anode=AC_L, Cathode=V_DC
D1 AC_L V_DC D1N4007
* D2: Anode=AC_N, Cathode=V_DC
D2 AC_N V_DC D1N4007
* D3: Anode=GND, Cathode=AC_L
D3 0 AC_L D1N4007
* D4: Anode=GND, Cathode=AC_N
D4 0 AC_N D1N4007

* --- Load Resistor ---
* 220 Ohm resistor across the DC output
R1 V_DC 0 220

* --- Filter Capacitors & Switching Logic ---
* We simulate the SPDT switch S1 by using two voltage-controlled switches.
* S_C1 connects V_DC to C1. S_C2 connects V_DC to C2.
* Control signals ensure only one is active at a time (break-before-make effectively).

* Capacitor C1 (10uF) path
S_C1 V_DC NET_C1 CTRL_C1 0 SW_MODEL
C1 NET_C1 0 10u

* Capacitor C2 (470uF) path
S_C2 V_DC NET_C2 CTRL_C2 0 SW_MODEL
C2 NET_C2 0 470u

* --- Control Signals (Dynamic Stimuli) ---
* CTRL_C1: Starts High (5V), goes Low (0V) at 100ms.
* Keeps C1 connected for the first 100ms.
V_CTRL_C1 CTRL_C1 0 PULSE(5 0 100m 1u 1u 1 2)

* CTRL_C2: Starts Low (0V), goes High (5V) at 100ms.
* Connects C2 for the remainder of the simulation.
V_CTRL_C2 CTRL_C2 0 PULSE(0 5 100m 1u 1u 1 2)

* --- Component Models ---
* Generic model for 1N4007 Power Diode
.model D1N4007 D(IS=7.03n RS=0.034 N=1.8 BV=1000 IBV=5u CJO=10p TT=100n)

* Ideal Switch Model (Threshold=2.5V, On-Res=10mOhm, Off-Res=100MegOhm)
.model SW_MODEL SW(Vt=2.5 Ron=0.01 Roff=100Meg)

* --- Analysis Directives ---
* Transient analysis: 200ms total time, 50us step size.
* This captures approx 6 cycles with C1 and 6 cycles with C2.
.tran 50u 200m

* Print directives for simulation log/plotting
.print tran V(V_DC) V(AC_L) V(AC_N)

.end

Simulation Results (Transient Analysis)

Simulation Results (Transient Analysis)
Show raw data table (4050 rows)
Index   time            v(v_dc)         v(ac_l)         v(ac_n)
0	0.000000e+00	6.658603e-23	4.156609e-18	4.156609e-18
1	5.000000e-07	1.885342e-19	1.599385e-03	-1.59938e-03
2	1.000000e-06	6.893339e-12	3.198770e-03	-3.19877e-03
3	2.000000e-06	3.416858e-11	6.397539e-03	-6.39754e-03
4	4.000000e-06	1.718574e-10	1.279507e-02	-1.27951e-02
5	8.000000e-06	9.966330e-10	2.559012e-02	-2.55901e-02
6	1.325366e-05	3.861142e-09	4.239524e-02	-4.23952e-02
7	2.095388e-05	1.446061e-08	6.702595e-02	-6.70259e-02
8	3.129676e-05	5.099200e-08	1.001088e-01	-1.00109e-01
9	4.482862e-05	1.835180e-07	1.433897e-01	-1.43390e-01
10	6.128867e-05	6.888081e-07	1.960312e-01	-1.96031e-01
11	8.042390e-05	2.827323e-06	2.572195e-01	-2.57217e-01
12	1.019046e-04	1.303092e-05	3.258956e-01	-3.25883e-01
13	1.254895e-04	6.815023e-05	4.012964e-01	-4.01228e-01
14	1.509795e-04	4.024321e-04	4.828893e-01	-4.82487e-01
15	1.782228e-04	2.626479e-03	5.709779e-01	-5.68351e-01
16	2.071492e-04	1.723315e-02	6.705660e-01	-6.53333e-01
17	2.380619e-04	8.388777e-02	8.024272e-01	-7.18539e-01
18	2.734880e-04	2.529945e-01	9.997734e-01	-7.46779e-01
19	3.097680e-04	4.785526e-01	1.227902e+00	-7.49349e-01
20	3.521718e-04	7.463483e-01	1.496384e+00	-7.50036e-01
21	3.938443e-04	1.008721e+00	1.759554e+00	-7.50833e-01
22	4.438443e-04	1.322891e+00	2.074586e+00	-7.51694e-01
23	4.938443e-04	1.636032e+00	2.388601e+00	-7.52568e-01
... (4026 more rows) ...

Common mistakes and how to avoid them

  • Reversed Capacitor Polarity: Electrolytic capacitors will explode if connected backwards. Solution: Ensure the side marked with a stripe (negative) connects to the 0 (GND) node and the other side to the positive rectifier output.
  • Under-rated Resistor Power: A 220 Ω resistor at ~15 V DC dissipates about 1 Watt (P = V^2 / R). Using a standard 1/4 W resistor will burn it. Solution: Use a power resistor (2 W+) or increase resistance to 1 kΩ (though this reduces ripple visibility).
  • Measuring Ripple on DC Setting: A standard multimeter on DC mode averages the voltage, hiding the ripple. Solution: Use an oscilloscope for visual analysis, or set the multimeter to AC mode to measure the RMS value of the ripple component only.

Troubleshooting

  • Symptom: No output voltage at V_DC.
    • Cause: AC source not on or bridge diodes open/connected incorrectly.
    • Fix: Check V1 output and verify diode orientation (ring marks on cathodes).
  • Symptom: Ripple does not change when swapping capacitors.
    • Cause: Load resistor $R1$ is missing or open circuit. Without a load, the capacitor has no path to discharge, so voltage stays at peak regardless of capacitance.
    • Fix: Ensure $R1$ is securely connected parallel to the capacitor.
  • Symptom: Fuse blows or transformer hums loudly.
    • Cause: Short circuit in the bridge (e.g., D1 and D3 shorting AC mains).
    • Fix: Power off immediately and check wiring. Ensure AC_L and AC_N are not directly connected to 0 or each other.

Possible improvements and extensions

  1. Voltage Regulator: Add an LM7812 or LM317 linear regulator after the capacitor to see how active regulation eliminates the remaining ripple.
  2. RC Pi Filter: Add a series resistor and a second capacitor ($C-R-C$) to create a passive low-pass filter, further reducing ripple without active components (at the cost of voltage drop).

More Practical Cases on Prometeo.blog

Find this product and/or books on this topic on Amazon

Go to Amazon

As an Amazon Associate, I earn from qualifying purchases. If you buy through this link, you help keep this project running.

Quick Quiz

Question 1: What is the primary objective of the practical case described in the text?


Question 2: Which component is responsible for converting the AC sine wave into pulsing DC in the described circuit?


Question 3: In the context of audio power supplies, what is a key benefit of reducing voltage ripple?


Question 4: What is the expected outcome for ripple voltage when using a small capacitor (10 µF)?


Question 5: Why is stable voltage important for Digital Logic Power as mentioned in the use cases?


Question 6: According to the expected outcome, how does the waveform transform through the circuit stages?


Question 7: Based on the diagram context, what is the RMS voltage of the AC source?


Question 8: Which component is placed in parallel with the capacitor bank to simulate a load?


Question 9: What is the specific value of the larger capacitor (C2) mentioned in the diagram context?


Question 10: How does smoothing the charging current benefit battery charging applications?


Carlos Núñez Zorrilla
Electronics & Computer Engineer

Telecommunications Electronics Engineer and Computer Engineer (official degrees in Spain).

Follow me:


Practical case: RC audio low-pass filter

RC audio low-pass filter prototype (Maker Style)

Level: Medium — Design and analyze a circuit that attenuates high frequencies using a capacitor and a resistor to verify the cutoff frequency.

Objective and use case

In this practical case, you will build a passive first-order Low-Pass Filter (LPF) using a resistor and a capacitor connected in series. You will analyze how the capacitor’s reactance changes with frequency, allowing low frequencies to pass while attenuating signals above a calculated cutoff point.

Why it is useful:
* Audio noise reduction: Removes high-frequency hiss or static from audio recordings.
* Subwoofer crossovers: Directs only low-frequency bass notes to the subwoofer driver.
* Signal conditioning: Acts as an anti-aliasing filter before Analog-to-Digital Conversion (ADC) to prevent digital artifacts.
* Power supply smoothing: Filters out high-frequency ripple noise from DC power lines.

Expected outcome:
* Passband: Frequencies below ~1 kHz retain approximately their original amplitude (Vin ≈ Vout).
* Cutoff point: At the calculated cutoff frequency (fc), the output voltage drops to approximately 70.7% of the input voltage (-3 dB).
* Stopband: Frequencies significantly higher than 1 kHz are heavily attenuated.
* Phase shift: Observe a phase lag of -45° at the cutoff frequency.

Target audience and level: Electronics students and audio enthusiasts; Level: Medium.

Materials

  • V1: AC Voltage Source (Sine Wave, 5 Vpk, tunable frequency), function: Input audio signal simulation.
  • R1: 1.6 kΩ resistor, function: Current limiting and voltage division partner.
  • C1: 100 nF capacitor (ceramic or film), function: Frequency-dependent shunt to ground.
  • Measurement Tool: Oscilloscope (Dual channel) or Bode Plotter.

Wiring guide

Construct the circuit using the following connections. Note the explicit node names for analysis.

  • V1 (Source): Connect the positive terminal to node VIN and the negative terminal to node 0 (GND).
  • R1: Connect one leg to node VIN and the other leg to node VOUT.
  • C1: Connect one leg to node VOUT and the other leg to node 0 (GND).
  • Oscilloscope Ch1: Connect probe tip to VIN and ground clip to 0.
  • Oscilloscope Ch2: Connect probe tip to VOUT and ground clip to 0.

Conceptual block diagram

Conceptual block diagram — RC Low Pass Filter
Quick read: inputs → main block → output (actuator or measurement). This summarizes the ASCII schematic below.

Schematic

[ SIGNAL SOURCE ]               [ RC FILTER STAGE ]                 [ MEASUREMENT ]

                              +--------------------------------------> [ Scope Ch1 (Input) ]
                              |
[ V1: AC Source ] --(VIN)-->--+--> [ R1: 1.6k Resistor ] --(VOUT)-->--+--> [ Scope Ch2 (Output) ]
      (5 Vpk)                                                         |
                                                                      +--> [ C1: 100nF Cap ] --> GND
Schematic (ASCII)

Electrical diagram

Electrical diagram for case: RC audio low-pass filter
Generated from the validated SPICE netlist for this case.

🔒 This electrical diagram is premium. With the 7-day pass or the monthly membership you can unlock the complete didactic material and the print-ready PDF pack.🔓 See premium access plans

Measurements and tests

Follow these steps to validate the filter design (fc ≈ 1 kHz):

  1. Low Frequency Test (Passband):

    • Set V1 to 100 Hz.
    • Measure Vout peak-to-peak. It should be nearly identical to Vin (approx. 5 V).
  2. Cutoff Frequency Verification (fc):

    • Increase V1 frequency to 1 kHz.
    • Measure Vout. It should drop to approximately 0.707 × Vin (approx. 3.53 V).
    • Measure the phase difference between Ch1 and Ch2. Vout should lag Vin by roughly 45°.
  3. High Frequency Test (Stopband):

    • Set V1 to 10 kHz (one decade above cutoff).
    • Measure Vout. The amplitude should be significantly attenuated (approx. 0.5 V or -20 dB relative to input).
  4. Bode Plot Analysis (Optional):

    • If using a simulation or Bode plotter, sweep from 10 Hz to 100 kHz. Observe the «roll-off» slope of -20 dB/decade after the cutoff point.

SPICE netlist and simulation

Reference SPICE Netlist (ngspice) — excerptFull SPICE netlist (ngspice)

* Practical case: RC audio low-pass filter

* --- Components per BOM and Wiring Guide ---
* V1: AC Voltage Source (Sine Wave, 5 Vpk, 1kHz, AC 1V for Bode)
* Connected: Positive -> VIN, Negative -> 0 (GND)
V1 VIN 0 DC 0 AC 1 SIN(0 5 1000)

* R1: 1.6 kOhm resistor
* Connected: VIN -> VOUT
R1 VIN VOUT 1.6k

* C1: 100 nF capacitor
* Connected: VOUT -> 0 (GND)
C1 VOUT 0 100n

* --- Simulation Commands ---
* Using .control block to sequence analyses and printing correctly in ngspice
.control
    * Transient Analysis: 1kHz signal, run for 5ms
    tran 10u 5ms
* ... (truncated in public view) ...

Copy this content into a .cir file and run with ngspice.

🔒 Part of this section is premium. With the 7-day pass or the monthly membership you can access the full content (materials, wiring, detailed build, validation, troubleshooting, variants and checklist) and download the complete print-ready PDF pack.

* Practical case: RC audio low-pass filter

* --- Components per BOM and Wiring Guide ---
* V1: AC Voltage Source (Sine Wave, 5 Vpk, 1kHz, AC 1V for Bode)
* Connected: Positive -> VIN, Negative -> 0 (GND)
V1 VIN 0 DC 0 AC 1 SIN(0 5 1000)

* R1: 1.6 kOhm resistor
* Connected: VIN -> VOUT
R1 VIN VOUT 1.6k

* C1: 100 nF capacitor
* Connected: VOUT -> 0 (GND)
C1 VOUT 0 100n

* --- Simulation Commands ---
* Using .control block to sequence analyses and printing correctly in ngspice
.control
    * Transient Analysis: 1kHz signal, run for 5ms
    tran 10u 5ms
    * Print transient results (Oscilloscope)
    print V(VIN) V(VOUT)

    * AC Analysis: Bode Plot, 10 Hz to 100 kHz
    ac dec 10 10 100k
    * Print AC results (Bode Plotter)
    print V(VOUT)

    * Operating Point
    op
.endc

.end

Simulation Results (Transient Analysis)

Simulation Results (Transient Analysis)
Show raw data table (512 rows)
Index   time            v(vin)          v(vout)
0	0.000000e+00	0.000000e+00	0.000000e+00
1	1.000000e-07	3.141592e-03	1.962269e-06
2	1.084035e-07	3.405596e-03	2.141025e-06
3	1.252105e-07	3.933604e-03	2.526248e-06
4	1.588245e-07	4.989618e-03	3.462948e-06
5	2.260525e-07	7.101647e-03	6.001184e-06
6	3.605086e-07	1.132570e-02	1.373560e-05
7	6.294206e-07	1.977378e-02	3.982505e-05
8	1.167245e-06	3.666975e-02	1.343969e-04
9	2.242893e-06	7.046023e-02	4.923968e-04
10	4.394190e-06	1.380300e-01	1.878099e-03
11	8.696783e-06	2.730815e-01	7.282571e-03
12	1.730197e-05	5.424874e-01	2.825846e-02
13	2.730197e-05	8.535162e-01	6.884897e-02
14	3.730197e-05	1.161176e+00	1.257276e-01
15	4.730197e-05	1.464254e+00	1.976662e-01
16	5.730197e-05	1.761553e+00	2.834382e-01
17	6.730197e-05	2.051900e+00	3.818193e-01
18	7.730197e-05	2.334149e+00	4.915893e-01
19	8.730197e-05	2.607186e+00	6.115335e-01
20	9.730197e-05	2.869934e+00	7.404442e-01
21	1.073020e-04	3.121356e+00	8.771230e-01
22	1.173020e-04	3.360458e+00	1.020383e+00
23	1.273020e-04	3.586299e+00	1.169049e+00
... (488 more rows) ...

Common mistakes and how to avoid them

  1. Swapping components (High-Pass vs. Low-Pass):
    • Error: Connecting C1 in series and R1 to ground creates a High-Pass filter.
    • Solution: Ensure the Capacitor is the component connected between the output node and Ground.
  2. Ignoring Load Impedance:
    • Error: Connecting a low-impedance load (like an 8 Ω speaker) directly to VOUT.
    • Solution: This passive filter has high output impedance. Use an op-amp buffer if driving a heavy load.
  3. Using Polarized Capacitors Incorrectly:
    • Error: Using an electrolytic capacitor with reverse polarity in an AC circuit without a DC bias.
    • Solution: For pure AC audio signals, use non-polarized capacitors (ceramic, film, or bipolar electrolytic).

Troubleshooting

  • Symptom: Vout is zero at all frequencies.
    • Cause: Short circuit across C1 or open circuit at R1.
    • Fix: Check continuity across C1; if it beeps, the capacitor is shorted or the node is grounded accidentally.
  • Symptom: No attenuation occurs at high frequencies.
    • Cause: C1 is open (broken) or R1 is shorted.
    • Fix: Replace C1. Verify R1 measures 1.6 kΩ.
  • Symptom: Cutoff frequency is totally wrong.
    • Cause: Incorrect component values (e.g., using 100 pF instead of 100 nF).
    • Fix: Double-check color codes on resistors and markings on capacitors (104 code = 100 nF).

Possible improvements and extensions

  1. Second-Order Filter: Cascade two RC stages in series to achieve a steeper roll-off (-40 dB/decade) for better noise rejection.
  2. Active Low-Pass Filter: Add an Operational Amplifier (Op-Amp) to create an active filter, allowing for signal gain and preventing the load from affecting the filter’s frequency response.

More Practical Cases on Prometeo.blog

Find this product and/or books on this topic on Amazon

Go to Amazon

As an Amazon Associate, I earn from qualifying purchases. If you buy through this link, you help keep this project running.

Quick Quiz

Question 1: What is the primary function of the passive first-order Low-Pass Filter (LPF) described in the text?


Question 2: Which two components are connected in series to build this specific filter?


Question 3: At the cutoff frequency (fc), what percentage of the input voltage is the output voltage approximately equal to?


Question 4: What is the decibel drop at the cutoff frequency?


Question 5: Which of the following is NOT listed as a use case for this circuit?


Question 6: In the expected outcome, what happens to frequencies in the passband (below ~1 kHz)?


Question 7: Why is this filter useful before Analog-to-Digital Conversion (ADC)?


Question 8: How does the capacitor behave in this circuit to achieve filtering?


Question 9: What is a specific application of this filter in audio systems mentioned in the text?


Question 10: What does this circuit filter out from DC power lines?


Carlos Núñez Zorrilla
Electronics & Computer Engineer

Telecommunications Electronics Engineer and Computer Engineer (official degrees in Spain).

Follow me: