Objective and use case
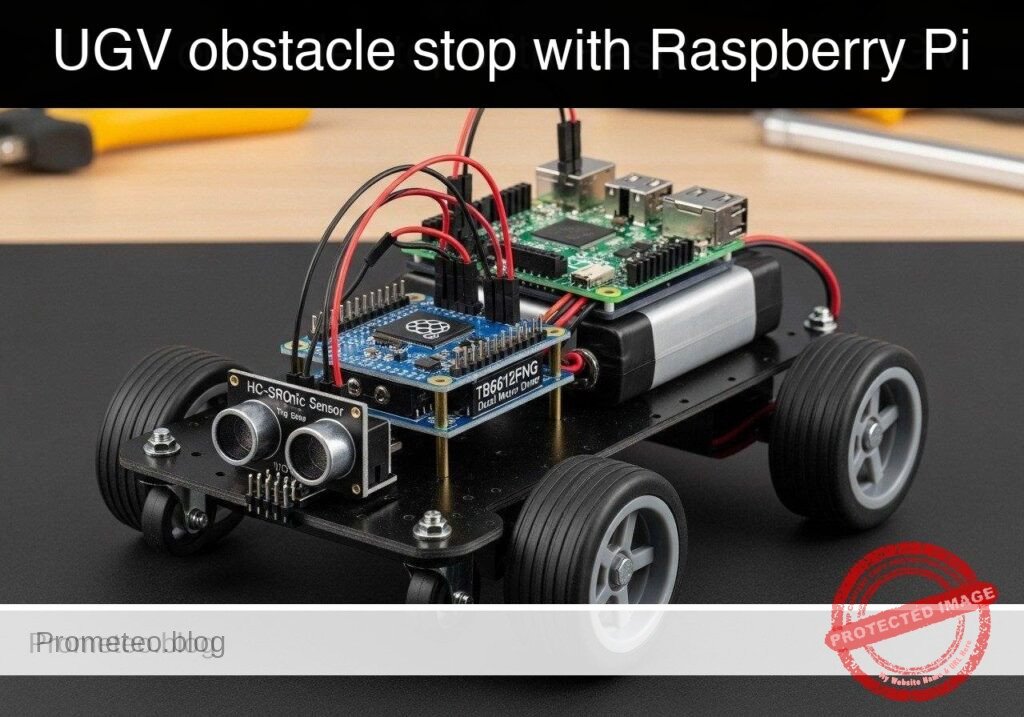
What you’ll build: A prototype 2WD automated guided vehicle (AGV) that continuously drives forward and executes a low-latency emergency halt when an obstacle is detected within 15 centimeters.
Why it matters / Use cases
- Warehouse Logistics: Essential for automated carts requiring robust collision avoidance to protect inventory and static shelving.
- Hardware Abstraction: Decouples high-level navigation logic from low-level GPIO manipulation, enabling code testing on standard laptops prior to physical deployment.
- Sensor Integration: Demonstrates safe interfacing of 5V analog/digital sensors (HC-SR04) with 3.3V microprocessors using voltage dividers.
- Motor Control: Applies H-bridge concepts for PWM speed control and standby state management using the TB6612FNG driver.
Expected outcome
- A Python 3.11 software architecture utilizing the Strategy pattern to seamlessly toggle between mock and physical hardware interfaces.
- Continuous ultrasonic distance polling executing at approximately 10Hz.
- Immediate motor deactivation (halt) triggered the moment measured distance drops below the 15.0 cm threshold.
Audience: Python developers and robotics engineers; Level: Intermediate
Architecture/flow: Python hardware abstraction layer polling an HC-SR04 sensor at 10Hz, evaluating distance thresholds, and driving a TB6612FNG motor controller via GPIO PWM with automatic halt overrides.
Educational validation note
Before publication, this case passed the Prometeo automated validation gate with status PASS. The validator checked the code blocks, article structure, copy/paste-safe commands and consistency with the supported device catalog.
Published validation evidence
- Automatic result: PASS.
- Parsed structure: 3 sections, 2 tables and 2 code blocks detected before publication.
- Checked code: 2 Python/py_compile.
- Supported catalog: the article text was checked against Prometeo’s validation-capable device profiles, and unsupported stacks block publication.
- Report findings: no blocking findings.
This validation confirms syntax and tool compatibility for the published material, but it does not replace physical testing on your exact hardware, wiring and runtime environment.
Educational safety note
This project is an educational prototype, not a certified product. Before powering the setup, verify the pinout of your exact ULX3S board revision, keep FPGA I/O signals at 3.3 V, never connect 5 V directly to I/O pins, disconnect power before changing wiring, and use suitable external supplies for loads, motors or servos while sharing ground only when the wiring requires it.
Conceptual block diagram
High-level view: what enters the system, what each block processes, and what comes out.
Functional architecture
Conceptual control flow: button input, mode selection, PWM timing and servo motion.

Validation path
The automated validation checks syntax, simulation/lint and compatibility with the ULX3S/ECP5 toolchain.

Prerequisites
- Software: A computer or laptop for dry-run testing (Windows, macOS, or Linux) with Python 3.11 installed. For physical deployment, a Raspberry Pi running Raspberry Pi OS Bookworm (64-bit) with Python 3.11 and the
gpiozerolibrary installed. - Skills: Basic familiarity with Linux command-line operations, fundamental Python programming (classes, inheritance, exception handling), and basic breadboarding (understanding common ground and voltage dividers).
Materials
To complete this practical case, you must use EXACTLY this device model configuration:
* Microcomputer: Raspberry Pi 4 Model B (any RAM variant).
* Motor Driver: TB6612FNG dual motor driver breakout board.
* Distance Sensor: HC-SR04 ultrasonic sensor.
* Robot Platform: 2WD UGV chassis (includes two DC gear motors and wheels).
* Power Supply: A 5V USB-C power bank for the Raspberry Pi, and a separate battery pack (e.g., 4x AA providing 6V) for the DC motors.
* Passive Components: One 1kΩ resistor and one 2kΩ resistor (required for the HC-SR04 voltage divider).
* Wiring: Breadboard and assorted male-to-female and male-to-male jumper wires.
Setup/Connection
Proper wiring is critical to prevent damage to the Raspberry Pi. The Raspberry Pi GPIO pins operate at 3.3V logic. The HC-SR04 requires 5V to operate and outputs a 5V signal on its ECHO pin. Connecting a 5V ECHO pin directly to a 3.3V GPIO pin will damage the Raspberry Pi. We must use a voltage divider (1kΩ and 2kΩ resistors) to step the 5V signal down to approximately 3.3V.
Furthermore, the motors must be powered by an external battery pack, not the Raspberry Pi’s 5V or 3.3V pins. DC motors draw significant current and create voltage spikes that can cause the Raspberry Pi to brown-out or reboot.
TB6612FNG Dual Motor Driver Wiring
| TB6612FNG Pin | Connection / Raspberry Pi GPIO | Purpose |
|---|---|---|
| VCC | Pi 3.3V (Pin 1) | Logic power for the motor driver IC. |
| VMOT | Battery Pack Positive (e.g., 6V) | High-current power for the DC motors. |
| GND | Pi GND (Pin 6) + Battery GND | Common ground reference. Crucial. |
| PWMA | Pi GPIO 12 (Pin 32) | PWM signal for Motor A (Left) speed. |
| AIN1 | Pi GPIO 5 (Pin 29) | Direction control 1 for Motor A. |
| AIN2 | Pi GPIO 6 (Pin 31) | Direction control 2 for Motor A. |
| STBY | Pi GPIO 17 (Pin 11) | Standby pin. Must be HIGH to enable motors. |
| PWMB | Pi GPIO 13 (Pin 33) | PWM signal for Motor B (Right) speed. |
| BIN1 | Pi GPIO 16 (Pin 36) | Direction control 1 for Motor B. |
| BIN2 | Pi GPIO 26 (Pin 37) | Direction control 2 for Motor B. |
| AO1 / AO2 | Left Motor Terminals | Power output to the Left DC motor. |
| BO1 / BO2 | Right Motor Terminals | Power output to the Right DC motor. |
HC-SR04 Ultrasonic Sensor Wiring
| HC-SR04 Pin | Connection | Purpose |
|---|---|---|
| VCC | Pi 5V (Pin 2) | Power supply for the ultrasonic sensor. |
| GND | Pi GND (Pin 39) | Common ground reference. |
| TRIG | Pi GPIO 23 (Pin 16) | Receives the 3.3V trigger pulse from the Pi. |
| ECHO | Voltage Divider -> Pi GPIO 24 (Pin 18) | Outputs 5V. Divider drops it to 3.3V for the Pi. |
Voltage Divider Construction for ECHO:
1. Connect the HC-SR04 ECHO pin to one end of a 1kΩ resistor.
2. Connect the other end of the 1kΩ resistor to Raspberry Pi GPIO 24.
3. From Raspberry Pi GPIO 24, connect a 2kΩ resistor to Ground (GND).
This forms a circuit where V_out = V_in * (2k / (1k + 2k)) = 5V * (2/3) = 3.33V.
Validation Method & Expected Evidence
To validate the performance claims (10Hz polling and absolute 15.0 cm halt threshold):
1. Dry-Run Verification: Run the main application with the --dry-run flag. Observe the console output. You should see 10 distance readings per second (10Hz). The mock distance will drop by 2 cm each tick. Exactly when the distance reads below 15.0 cm, the console must output OBSTACLE DETECTED! Executing emergency halt. and immediately exit.
2. Physical Verification: Place the completed robot on a flat surface facing a wall exactly 30 cm away. Run the physical script. The robot should move forward and stop. Use a measuring tape to measure the distance between the front of the HC-SR04 sensor and the wall. The expected evidence is a resting distance of approximately 14.0 cm to 14.9 cm (accounting for physical inertia after the 15.0 cm trigger).
Hardware Abstraction Layer Code
Save the following code as ugv_hardware.py. This file handles the direct GPIO manipulation or mock output depending on how it is invoked by the main script.
"""
ugv_hardware.py
Hardware Abstraction Layer for the UGV.
Provides physical and mock implementations for the TB6612FNG and HC-SR04.
"""

try:
    from gpiozero import PWMOutputDevice, DigitalOutputDevice, DistanceSensor
    HAS_GPIO = True
except ImportError:
    HAS_GPIO = False

class BaseMotorDriver:
    """Abstract base class for a dual motor driver."""
    def forward(self, speed_percent: float) -> None:
        pass

    def stop(self) -> None:
        pass

class BaseUltrasonic:
    """Abstract base class for an ultrasonic distance sensor."""
    def get_distance_cm(self) -> float:
        return 0.0

class MockMotorDriver(BaseMotorDriver):
    """Simulated motor driver for dry-run testing."""
    def forward(self, speed_percent: float) -> None:
        print(f"[MOCK MOTOR] Moving FORWARD at {speed_percent}% speed.")

    def stop(self) -> None:
        print("[MOCK MOTOR] HALTED.")

class MockUltrasonic(BaseUltrasonic):
    """Simulated ultrasonic sensor that gradually approaches an obstacle."""
    def __init__(self) -> None:
        self.tick_count = 0
        self.starting_distance = 35.0  # Start at 35 cm

    def get_distance_cm(self) -> float:
        self.tick_count += 1
        # Simulate moving 2 cm closer each tick
        current_distance = self.starting_distance - (self.tick_count * 2.0)
        if current_distance < 5.0:
            current_distance = 5.0
        return current_distance

class PhysicalMotorDriver(BaseMotorDriver):
    """Physical motor driver using gpiozero for TB6612FNG."""
    def __init__(self) -> None:
        if not HAS_GPIO:
            raise RuntimeError("gpiozero library not found. Cannot use physical hardware.")
        # Left motor
        self.pwma = PWMOutputDevice(12)
        self.ain1 = DigitalOutputDevice(5)
        self.ain2 = DigitalOutputDevice(6)
        # Right motor
        self.pwmb = PWMOutputDevice(13)
        self.bin1 = DigitalOutputDevice(16)
        self.bin2 = DigitalOutputDevice(26)
        # Standby
        self.stby = DigitalOutputDevice(17)
        self.stby.on()  # Enable driver

    def forward(self, speed_percent: float) -> None:
        speed = max(0.0, min(1.0, speed_percent / 100.0))

        self.ain1.on()
        self.ain2.off()
        self.pwma.value = speed

        self.bin1.on()
        self.bin2.off()
        self.pwmb.value = speed

    def stop(self) -> None:
        self.pwma.value = 0.0
        self.pwmb.value = 0.0
        self.ain1.off()
        self.ain2.off()
        self.bin1.off()
        self.bin2.off()

class PhysicalUltrasonic(BaseUltrasonic):
    """Physical ultrasonic sensor using gpiozero for HC-SR04."""
    def __init__(self) -> None:
        if not HAS_GPIO:
            raise RuntimeError("gpiozero library not found. Cannot use physical hardware.")
        # max_distance=2.0 meters provides enough range for a 15cm threshold
        self.sensor = DistanceSensor(echo=24, trigger=23, max_distance=2.0)

    def get_distance_cm(self) -> float:
        # DistanceSensor returns distance in meters, convert to cm
        return self.sensor.distance * 100.0
Main Control Logic Code
Save the following code as ugv_main.py in the same directory. This script contains the 10Hz polling logic and obstacle avoidance threshold.
"""
ugv_main.py
Main control logic for the UGV obstacle avoidance.
"""

import time
import argparse
import sys
from ugv_hardware import (
    MockMotorDriver, MockUltrasonic,
    PhysicalMotorDriver, PhysicalUltrasonic, HAS_GPIO
)

def main() -> None:
    parser = argparse.ArgumentParser(description="UGV Obstacle Avoidance Control")
    parser.add_argument("--dry-run", action="store_true", help="Run with mock hardware")
    args = parser.parse_args()

    if args.dry_run:
        print("Initializing MOCK hardware...")
        motor = MockMotorDriver()
        sensor = MockUltrasonic()
    else:
        if not HAS_GPIO:
            print("Error: gpiozero not installed. Run with --dry-run or install gpiozero.")
            sys.exit(1)
        print("Initializing PHYSICAL hardware...")
        motor = PhysicalMotorDriver()
        sensor = PhysicalUltrasonic()

    threshold_cm = 15.0
    polling_rate_hz = 10.0
    sleep_interval = 1.0 / polling_rate_hz

    print("Starting UGV autonomous navigation...")
    try:
        while True:
            distance = sensor.get_distance_cm()
            print(f"Distance: {distance:.1f} cm")

            if distance < threshold_cm:
                print("OBSTACLE DETECTED! Executing emergency halt.")
                motor.stop()

                if args.dry_run:
                    # Break out of loop for automated dry-run validation
                    print("Dry-run test complete.")
                    break
            else:
                motor.forward(50.0)  # Drive forward at 50% speed

            time.sleep(sleep_interval)

    except KeyboardInterrupt:
        print("\nManual override triggered. Shutting down.")
    finally:
        motor.stop()
        print("UGV safely halted.")

if __name__ == "__main__":
    main()
Find this product and/or books on this topic on Amazon
As an Amazon Associate, I earn from qualifying purchases. If you buy through this link, you help keep this project running.
Quick Quiz

Telecommunications Electronics Engineer and Computer Engineer (official degrees in Spain).