
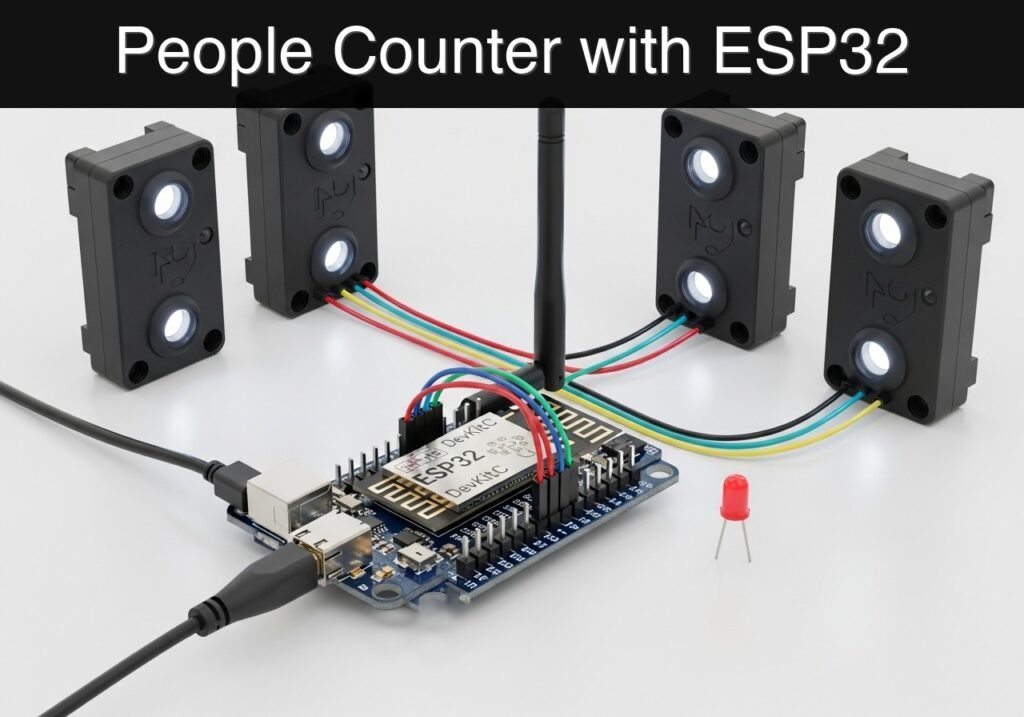
Objective and use case
What you’ll build: You will build a directional doorway people counter using dual infrared (IR) break-beam sensors to track individuals entering and exiting a room, broadcasting the real-time occupancy count over Bluetooth Low Energy (BLE).
Why it matters / Use cases
- HVAC & Energy Optimization: Dynamically adjust climate control based on actual room occupancy, reducing energy waste by up to 20%.
- Usage-based Maintenance: Trigger janitorial alerts automatically after a specific threshold (e.g., 50 entries) instead of relying on inefficient fixed schedules.
- Retail & Space Analytics: Track peak visitor hours and correlate footfall with sales data, or monitor conference room utilization to optimize building layout.
Expected outcome
- A deployed edge device accurately tracking directional movement with <50ms sensor polling latency.
- Real-time BLE advertising of current room occupancy at a 1Hz update rate with minimal power consumption.
- Robust debouncing logic that ignores partial crossings or false triggers to maintain an accurate count.
Audience: IoT Developers, Facility Managers, Makers; Level: Intermediate
Architecture/flow: Dual IR Break-Beam Sensors → Microcontroller GPIO Interrupts → Directional Counting Logic → BLE Advertisement → Gateway/Dashboard
Educational validation note
Before publication, this case passed the Prometeo automated validation gate with status PASS. For this ESP32 DevKitC profile, the project was checked as a PlatformIO project: the validator extracted platformio.ini and src/main.cpp, created a temporary project and ran pio run against platform = espressif32, board = esp32dev and framework = arduino. It also checked article structure, copy/paste-safe ASCII command options, and unsupported stacks such as direct ESP-IDF or non-scoped ESP32 boards.
Published validation evidence
- Automatic result: PASS.
- Parsed structure: 3 sections, 3 tables and 2 code blocks detected before publication.
- Checked code: 1 PlatformIO config + 1 ESP32 source/pio run.
- Supported catalog: the article text was checked against Prometeo’s validation-capable device profiles, and unsupported stacks block publication.
- Report findings: no blocking findings.
This validation confirms syntax and tool compatibility for the published code, but it does not replace physical testing on your exact ESP32 DevKitC board, wiring, power supply and local WiFi environment.
Educational safety note
This prototype is designed strictly for educational and basic monitoring purposes. It must not be used for critical capacity enforcement, fire code compliance, emergency evacuation tracking, or security access control. The IR sensors used in standard hobby kits are eye-safe, but care should be taken to ensure wires traversing a doorway do not create a tripping hazard. If deploying in a real environment, secure all wiring safely and use proper enclosures.
Conceptual block diagram
High-level view: what enters the system, what each block processes, and what comes out.
Functional architecture
Conceptual flow: local configuration, BLE advertising and phone-side reading.

Validation path
Conceptual summary of the tools used to check the published ESP32 project.

Prerequisites
- Software: Visual Studio Code (VSCode) with the PlatformIO IDE extension installed.
- Drivers: CP210x or CH34x USB-to-UART drivers installed on your host computer (depending on your specific ESP32 DevKitC USB bridge).
- Mobile App: A BLE scanner application on your smartphone (e.g., LightBlue or BLE Scanner) to read the BLE broadcasts.
- Knowledge: Basic familiarity with breadboarding and C++ programming.
Materials
- Microcontroller: ESP32 DevKitC + dual IR break-beam sensors + status LED
- Note: The IR break-beam sensors typically come in pairs (one emitter, one receiver). You need two complete pairs for directional sensing.
- Power Supply: Standard Micro-USB or USB-C cable (depending on your DevKitC variant) connected to your computer for power and programming.
- Wiring: Breadboard and assorted male-to-male and male-to-female jumper wires.
- Passive Components: One 220Ω or 330Ω resistor for the external status LED (if not using the built-in LED).
Setup/Connection
The hardware setup requires aligning the two IR break-beam sensor pairs across a doorway or a simulated cardboard archway. The emitters are simply powered, while the receivers act as digital switches connected to the ESP32. When the beam is unbroken, the receiver outputs a HIGH signal. When an object breaks the beam, the receiver outputs a LOW signal.
Mount the sensors horizontally. Sensor A should be placed on the “outside” of the threshold, and Sensor B should be placed on the “inside,” spaced about 3 to 5 inches apart—close enough that a person walking through will break both beams sequentially, but far enough apart to detect a clear directional sequence.
| Component | Pin / Terminal | ESP32 DevKitC Pin | Notes |
|---|---|---|---|
| IR Emitter A (Outside) | VCC / 5V | 5V (VIN) | Emitters only need power and ground. |
| IR Emitter A (Outside) | GND | GND | Connect to common ground rail. |
| IR Receiver A (Outside) | VCC / 5V | 3.3V or 5V | Check sensor spec; most logic is 3.3V safe. |
| IR Receiver A (Outside) | GND | GND | Connect to common ground rail. |
| IR Receiver A (Outside) | OUT / Signal | GPIO 32 | Digital input (HIGH = unbroken, LOW = broken). |
| IR Emitter B (Inside) | VCC / 5V | 5V (VIN) | Power for the second beam. |
| IR Emitter B (Inside) | GND | GND | Connect to common ground rail. |
| IR Receiver B (Inside) | VCC / 5V | 3.3V or 5V | Check sensor spec. |
| IR Receiver B (Inside) | GND | GND | Connect to common ground rail. |
| IR Receiver B (Inside) | OUT / Signal | GPIO 33 | Digital input (HIGH = unbroken, LOW = broken). |
| Status LED | Anode (Long leg) | GPIO 2 | Via 220Ω resistor. (Often maps to onboard LED). |
| Status LED | Cathode (Short leg) | GND | Connect to common ground rail. |
Note: If your IR receivers output a 5V logic high, you must use a logic level shifter or a voltage divider before connecting them to the ESP32’s 3.3V GPIO pins to prevent damage. Many standard IR break-beam receivers are open-collector or run fine on 3.3V power.
Validated Code
The following files constitute the complete PlatformIO project. The logic uses a polling state machine to track the sequence of sensor breaks, filtering out noise and ensuring that a count is only registered when a person completely passes through both beams in a specific order.
platformio.ini
[env:esp32dev]
platform = espressif32
board = esp32dev
framework = arduino
monitor_speed = 115200
src/main.cpp
Public preview of the validated file. The complete source is shown to members and in PDF/Print.
#include <Arduino.h>
#include <BLEDevice.h>
#include <BLEServer.h>
#include <BLEUtils.h>
#include <BLE2902.h>

// ---------------------------------------------------------
// Pin Definitions
// ---------------------------------------------------------
#define SENSOR_A_PIN 32 // Outside sensor
#define SENSOR_B_PIN 33 // Inside sensor
#define LED_PIN 2       // Status LED

// ---------------------------------------------------------
// BLE Configuration
// ---------------------------------------------------------
// Generate custom UUIDs using a tool like uuidgenerator.net
#define SERVICE_UUID        "4fafc201-1fb5-459e-8fcc-c5c9c331914b"
#define CHARACTERISTIC_UUID "beb5483e-36e1-4688-b7f5-ea07361b26a8"

BLEServer* pServer = nullptr;
BLECharacteristic* pCharacteristic = nullptr;
bool deviceConnected = false;
bool oldDeviceConnected = false;

// ---------------------------------------------------------
// Application State
// ---------------------------------------------------------
int peopleCount = 0;

enum DirectionState {
    STATE_IDLE,
    STATE_A_BROKEN_FIRST,
    STATE_B_BROKEN_FIRST,
    STATE_WAIT_CLEAR_ENTER,
    STATE_WAIT_CLEAR_EXIT
};

DirectionState currentState = STATE_IDLE;

// ---------------------------------------------------------
// BLE Server Callbacks
// ---------------------------------------------------------
class MyServerCallbacks: public BLEServerCallbacks {
    void onConnect(BLEServer* pServer) {
      deviceConnected = true;
      Serial.println("BLE Client Connected");
    };

    void onDisconnect(BLEServer* pServer) {
      deviceConnected = false;
      Serial.println("BLE Client Disconnected");
    }
};

// ---------------------------------------------------------
// Helper Functions
// ---------------------------------------------------------
void updateBLECount() {
    if (deviceConnected && pCharacteristic != nullptr) {
        // Format the count as a readable string for easy validation
        char countStr[32];
        snprintf(countStr, sizeof(countStr), "Occupancy: %d", peopleCount);
        pCharacteristic->setValue((uint8_t*)countStr, strlen(countStr));
        pCharacteristic->notify();
        Serial.print("BLE Updated: ");
        Serial.println(countStr);
    }
}

void blinkLED() {
    digitalWrite(LED_PIN, HIGH);
    delay(200);
    digitalWrite(LED_PIN, LOW);
}

// ---------------------------------------------------------
// Setup
// ---------------------------------------------------------
void setup() {
    Serial.begin(115200);
    Serial.println("Starting BLE Doorway People Counter...");

    // Initialize Pins
    pinMode(SENSOR_A_PIN, INPUT_PULLUP);
    pinMode(SENSOR_B_PIN, INPUT_PULLUP);
    pinMode(LED_PIN, OUTPUT);
    digitalWrite(LED_PIN, LOW);

    // Initialize BLE
    BLEDevice::init("ESP32_Counter");
    pServer = BLEDevice::createServer();
    pServer->setCallbacks(new MyServerCallbacks());

    BLEService *pService = pServer->createService(SERVICE_UUID);

    // Create Characteristic with Read and Notify properties
    pCharacteristic = pService->createCharacteristic(
                        CHARACTERISTIC_UUID,
                        BLECharacteristic::PROPERTY_READ   |
                        BLECharacteristic::PROPERTY_NOTIFY
                      );

    // Add CCCD descriptor for notifications
    pCharacteristic->addDescriptor(new BLE2902());

    // Set initial value
    char initStr[32];
    snprintf(initStr, sizeof(initStr), "Occupancy: %d", peopleCount);
    pCharacteristic->setValue((uint8_t*)initStr, strlen(initStr));

    pService->start();

    // Start advertising
    BLEAdvertising *pAdvertising = BLEDevice::getAdvertising();
    pAdvertising->addServiceUUID(SERVICE_UUID);
    pAdvertising->setScanResponse(false);
    pAdvertising->setMinPreferred(0x0);
    BLEDevice::startAdvertising();

    Serial.println("BLE Advertising started. Waiting for connections...");
}
// ...#include <Arduino.h>
#include <BLEDevice.h>
#include <BLEServer.h>
#include <BLEUtils.h>
#include <BLE2902.h>
// ---------------------------------------------------------
// Pin Definitions
// ---------------------------------------------------------
#define SENSOR_A_PIN 32 // Outside sensor
#define SENSOR_B_PIN 33 // Inside sensor
#define LED_PIN 2 // Status LED
// ---------------------------------------------------------
// BLE Configuration
// ---------------------------------------------------------
// Generate custom UUIDs using a tool like uuidgenerator.net
#define SERVICE_UUID "4fafc201-1fb5-459e-8fcc-c5c9c331914b"
#define CHARACTERISTIC_UUID "beb5483e-36e1-4688-b7f5-ea07361b26a8"
BLEServer* pServer = nullptr;
BLECharacteristic* pCharacteristic = nullptr;
bool deviceConnected = false;
bool oldDeviceConnected = false;
// ---------------------------------------------------------
// Application State
// ---------------------------------------------------------
int peopleCount = 0;
enum DirectionState {
STATE_IDLE,
STATE_A_BROKEN_FIRST,
STATE_B_BROKEN_FIRST,
STATE_WAIT_CLEAR_ENTER,
STATE_WAIT_CLEAR_EXIT
};
DirectionState currentState = STATE_IDLE;
// ---------------------------------------------------------
// BLE Server Callbacks
// ---------------------------------------------------------
class MyServerCallbacks: public BLEServerCallbacks {
void onConnect(BLEServer* pServer) {
deviceConnected = true;
Serial.println("BLE Client Connected");
};
void onDisconnect(BLEServer* pServer) {
deviceConnected = false;
Serial.println("BLE Client Disconnected");
}
};
// ---------------------------------------------------------
// Helper Functions
// ---------------------------------------------------------
void updateBLECount() {
if (deviceConnected && pCharacteristic != nullptr) {
// Format the count as a readable string for easy validation
char countStr[32];
snprintf(countStr, sizeof(countStr), "Occupancy: %d", peopleCount);
pCharacteristic->setValue((uint8_t*)countStr, strlen(countStr));
pCharacteristic->notify();
Serial.print("BLE Updated: ");
Serial.println(countStr);
}
}
void blinkLED() {
digitalWrite(LED_PIN, HIGH);
delay(200);
digitalWrite(LED_PIN, LOW);
}
// ---------------------------------------------------------
// Setup
// ---------------------------------------------------------
void setup() {
Serial.begin(115200);
Serial.println("Starting BLE Doorway People Counter...");
// Initialize Pins
pinMode(SENSOR_A_PIN, INPUT_PULLUP);
pinMode(SENSOR_B_PIN, INPUT_PULLUP);
pinMode(LED_PIN, OUTPUT);
digitalWrite(LED_PIN, LOW);
// Initialize BLE
BLEDevice::init("ESP32_Counter");
pServer = BLEDevice::createServer();
pServer->setCallbacks(new MyServerCallbacks());
BLEService *pService = pServer->createService(SERVICE_UUID);
// Create Characteristic with Read and Notify properties
pCharacteristic = pService->createCharacteristic(
CHARACTERISTIC_UUID,
BLECharacteristic::PROPERTY_READ |
BLECharacteristic::PROPERTY_NOTIFY
);
// Add CCCD descriptor for notifications
pCharacteristic->addDescriptor(new BLE2902());
// Set initial value
char initStr[32];
snprintf(initStr, sizeof(initStr), "Occupancy: %d", peopleCount);
pCharacteristic->setValue((uint8_t*)initStr, strlen(initStr));
pService->start();
// Start advertising
BLEAdvertising *pAdvertising = BLEDevice::getAdvertising();
pAdvertising->addServiceUUID(SERVICE_UUID);
pAdvertising->setScanResponse(false);
pAdvertising->setMinPreferred(0x0);
BLEDevice::startAdvertising();
Serial.println("BLE Advertising started. Waiting for connections...");
}
// ---------------------------------------------------------
// Main Loop
// ---------------------------------------------------------
void loop() {
    // Handle BLE disconnection/reconnection gracefully
    if (!deviceConnected && oldDeviceConnected) {
        delay(500); // Give the bluetooth stack the chance to get things ready
        pServer->startAdvertising();
        Serial.println("Restarted BLE advertising");
        oldDeviceConnected = deviceConnected;
    }
    if (deviceConnected && !oldDeviceConnected) {
        oldDeviceConnected = deviceConnected;
    }

    // Read sensor states (LOW means the beam is broken)
    bool aBroken = (digitalRead(SENSOR_A_PIN) == LOW);
    bool bBroken = (digitalRead(SENSOR_B_PIN) == LOW);

    // State Machine for Directional Counting
    switch (currentState) {
        case STATE_IDLE:
            if (aBroken && !bBroken) {
                currentState = STATE_A_BROKEN_FIRST;
                Serial.println("State: A Broken (Potential Entry)");
            } else if (bBroken && !aBroken) {
                currentState = STATE_B_BROKEN_FIRST;
Serial.println("State: B Broken (Potential Exit)");
}
break;
case STATE_A_BROKEN_FIRST:
// If B breaks while A is or was broken, person is moving forward
if (bBroken) {
currentState = STATE_WAIT_CLEAR_ENTER;
Serial.println("State: B Broken (Completing Entry)");
} else if (!aBroken && !bBroken) {
// False alarm, person backed out before breaking B
currentState = STATE_IDLE;
Serial.println("State: Idle (False Alarm A)");
}
break;
case STATE_B_BROKEN_FIRST:
// If A breaks while B is or was broken, person is moving outward
if (aBroken) {
currentState = STATE_WAIT_CLEAR_EXIT;
Serial.println("State: A Broken (Completing Exit)");
} else if (!aBroken && !bBroken) {
// False alarm, person backed out before breaking A
currentState = STATE_IDLE;
Serial.println("State: Idle (False Alarm B)");
}
break;
case STATE_WAIT_CLEAR_ENTER:
// Wait for both sensors to clear before counting to avoid multiple counts
if (!aBroken && !bBroken) {
peopleCount++;
Serial.print("Person Entered! Total: ");
Serial.println(peopleCount);
updateBLECount();
blinkLED();
currentState = STATE_IDLE;
}
break;
case STATE_WAIT_CLEAR_EXIT:
// Wait for both sensors to clear before counting
if (!aBroken && !bBroken) {
if (peopleCount > 0) {
peopleCount--;
}
Serial.print("Person Exited! Total: ");
Serial.println(peopleCount);
updateBLECount();
blinkLED();
currentState = STATE_IDLE;
}
break;
}
// Small delay for debouncing and CPU yield
delay(20);
}
Build/Flash/Run commands
Use the PlatformIO CLI to compile, upload, and monitor the project.
| Action | Command |
|---|---|
| Initialize/Build | pio run |
| Upload to ESP32 | pio run --target upload |
| Open Serial Monitor | pio device monitor |
Workflow:
1. Open your terminal in VSCode at the root of your PlatformIO project.
2. Execute pio run to download the ESP32 framework and compile the C++ code. Ensure it completes with a SUCCESS message.
3. Connect the ESP32 DevKitC via USB. Execute pio run --target upload to flash the firmware.
4. Execute pio device monitor to observe the boot logs and sensor state transitions.
Step-by-step Validation
Use these checkpoints to verify the functionality of your doorway people counter.
- Boot and BLE Initialization
- Action: Open the serial monitor and press the
EN(Reset) button on the ESP32. - Expected observation: The monitor prints “Starting BLE Doorway People Counter…” followed by “BLE Advertising started. Waiting for connections…”.
- Pass condition: No boot loops or crash dumps occur.
- Action: Open the serial monitor and press the
- BLE Discovery and Connection
- Action: Open a BLE Scanner app (like LightBlue) on your smartphone. Scan for devices and look for “ESP32_Counter”. Tap “Connect”.
- Expected observation: The serial monitor prints “BLE Client Connected”. The app shows the custom Service (
4fafc201...) and Characteristic (beb5483e...). - Pass condition: You can successfully subscribe to notifications for the characteristic in the app.
- Walk-in Detection (Entry)
- Action: Block Sensor A (Outside) with your hand, then block Sensor B (Inside), then remove your hand from both.
- Expected observation: The serial monitor logs state transitions ending with “Person Entered! Total: 1”. The status LED blinks once.
- Pass condition: The BLE scanner app updates automatically to display “Occupancy: 1”.
- Walk-out Detection (Exit)
- Action: Block Sensor B (Inside), then block Sensor A (Outside), then remove your hand from both.
- Expected observation: The serial monitor logs state transitions ending with “Person Exited! Total: 0”. The status LED blinks once.
- Pass condition: The BLE scanner app updates automatically to display “Occupancy: 0”.
- False Alarm Handling
- Action: Block Sensor A only, then remove your hand without blocking Sensor B.
- Expected observation: The serial monitor prints “State: A Broken (Potential Entry)” followed by “State: Idle (False Alarm A)”. The count does not change.
- Pass condition: The occupancy count remains stable and no BLE notification is triggered.
Troubleshooting
| Symptom | Likely cause | Fix |
|---|---|---|
| Code fails to upload to ESP32 | Missing CP210x/CH34x driver, or ESP32 not in boot mode. | Install drivers. Hold the BOOT button on the DevKitC when “Connecting…” appears during upload. |
| Count increments multiple times per pass | Sensor bouncing or beams placed too close together. | Increase the physical distance between Sensor A and B. Ensure the delay(20) debounce in the code is sufficient. |
| Sensors never trigger (always IDLE) | Receivers are incorrectly wired or beams are misaligned. | Ensure emitters are perfectly aligned with receivers. Check that receivers are connected to GPIO 32 and 33. |
| Count goes negative | Initial count was 0 and someone exited, or directional logic is flipped. | The code prevents negative counts (if (peopleCount > 0)). If entry registers as exit, swap the wires on GPIO 32 and 33. |
| BLE device not found on phone | ESP32 is not advertising or phone Bluetooth cache is stale. | Reset the ESP32. Toggle your phone’s Bluetooth off and on to clear the scan cache. |
Improvements
Once you have mastered the basic prototype, consider these enhancements to make the device more robust for real-world deployment:
Advanced Logic and Reliability
* Timeout Handling: Implement a timer in the state machine. If a person breaks Sensor A but stands there for 10 seconds without breaking Sensor B, the state should reset to IDLE to prevent the system from hanging.
* Debounce Tuning: Replace the simple delay(20) with non-blocking millis() based debouncing to ensure the BLE stack is never starved of CPU time during rapid sensor events.
Data Integration and Scaling
* BLE Gateway Integration: Instead of a smartphone, use a PC or another ESP32 as a BLE Central device to aggregate data from multiple doorways and push it to an MQTT broker.
* Time-Series Logging: Add a Real-Time Clock (RTC) module and an SD card reader to log timestamps of every entry and exit for later data analysis.
Power Optimization
* Sleep Modes: If battery powered, configure the ESP32 to enter light sleep, using the GPIO pins connected to the IR receivers as wake-up sources. Note that BLE advertising consumes significant power, so you may want to batch data and only transmit periodically.
Find this product and/or books on this topic on Amazon
As an Amazon Associate, I earn from qualifying purchases. If you buy through this link, you help keep this project running.
Quick Quiz

Telecommunications Electronics Engineer and Computer Engineer (official degrees in Spain).

