
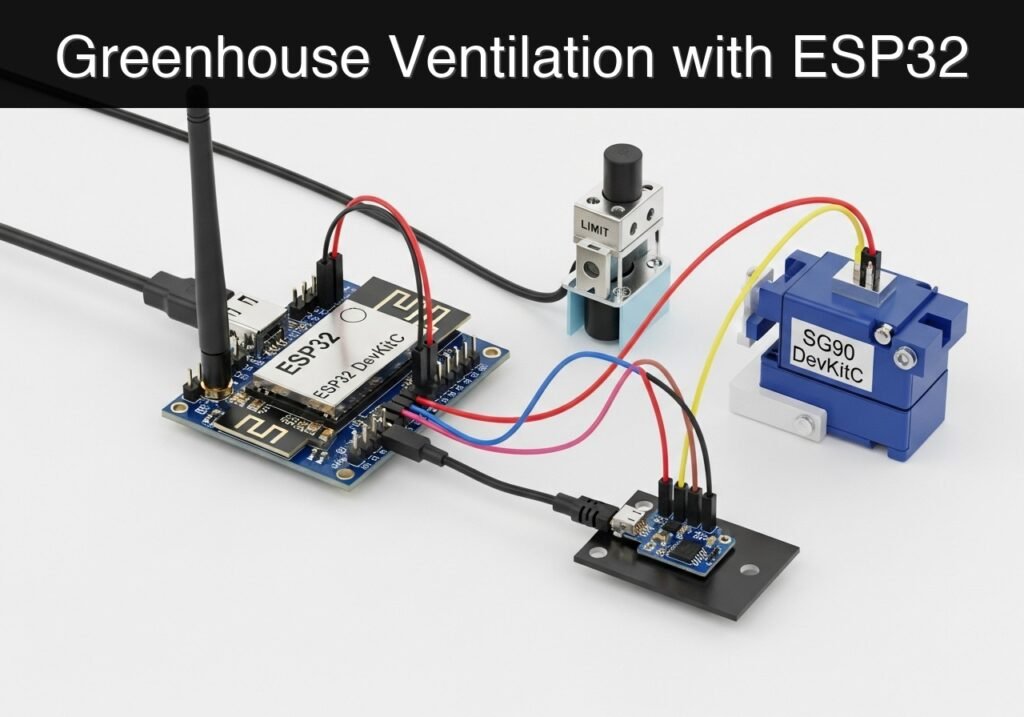
Objective and use case
What you’ll build: A local web-controlled servo mechanism that regulates a model greenhouse vent. It integrates a limit switch for precise mechanical zero-positioning to prevent motor stalling and ensure accurate actuation.
Why it matters / Use cases
- Automated Climate Control: Demonstrates the physical actuation layer required to release excess heat and humidity in real-world agricultural environments.
- Closed-Loop Safety: Limit switch integration prevents blind open-loop commands, avoiding >1A stall currents and mechanical grinding if linkages slip.
- Local Network Control: The ESP32 acts as a SoftAP, providing direct smartphone control with <50ms latency without requiring an external router or active internet connection.
- Asynchronous State Management: Non-blocking servo sweeps ensure the web server continuously processes concurrent client requests without execution delays or timeouts.
Expected outcome
- An active local WiFi Access Point named
ESP32-Greenhousebroadcasted by the ESP32. - A responsive web dashboard accessible at
192.168.4.1to command specific vent angles (0° to 90°). - Automatic mechanical homing that reliably calibrates the vent to a physical 0-position upon system boot or reset.
Audience: IoT Developers, AgTech Engineers; Level: Intermediate
Architecture/flow: Web Client (Smartphone) → ESP32 SoftAP (Async Web Server) → PWM Control → Servo Motor ↔ Limit Switch (GPIO Feedback).
Educational validation note
Before publication, this case passed the Prometeo automated validation gate with status PASS. For this ESP32 DevKitC profile, the project was checked as a PlatformIO project: the validator extracted platformio.ini and src/main.cpp, created a temporary project and ran pio run against platform = espressif32, board = esp32dev and framework = arduino. It also checked article structure, copy/paste-safe ASCII command options, and unsupported stacks such as direct ESP-IDF or non-scoped ESP32 boards.
Published validation evidence
- Automatic result: PASS.
- Parsed structure: 4 sections, 2 tables and 2 code blocks detected before publication.
- Checked code: 1 PlatformIO config + 1 ESP32 source/pio run.
- Supported catalog: the article text was checked against Prometeo’s validation-capable device profiles, and unsupported stacks block publication.
- Report findings: no blocking findings.
This validation confirms syntax and tool compatibility for the published code, but it does not replace physical testing on your exact ESP32 DevKitC board, wiring, power supply and local WiFi environment.
Educational safety note
This project is a low-voltage educational prototype, not a certified product. Before powering the setup, verify the pinout of your exact ESP32 DevKitC board, keep GPIO signals within 3.3 V limits, never apply 5 V to ESP32 inputs, disconnect power before changing wiring, and use suitable external supplies for relays, motors or loads while sharing GND only when the schematic requires it.
Conceptual block diagram
High-level view: what enters the system, what each block processes, and what comes out.
Functional architecture
Conceptual flow: moisture detection, local decision and user alert.

Validation path
Conceptual summary of the tools used to check the published ESP32 project.

Prerequisites
Before starting this tutorial, ensure you have the following ready:
* Software: Visual Studio Code with the PlatformIO IDE extension installed.
* Knowledge: Basic familiarity with C++ syntax, ESP32 GPIO concepts (PWM and Digital Inputs), and navigating the PlatformIO interface.
* Tools: A micro-USB or USB-C cable (depending on your specific ESP32 DevKitC variant) capable of both power and data transfer.
Materials
To complete this project, you will need exactly this device model and accompanying components:
* ESP32 DevKitC + SG90 servo + limit switch + local web dashboard (The dashboard is implemented in software).
* ESP32 DevKitC V4: The core microcontroller providing WiFi capabilities, PWM generation, and web server hosting.
* SG90 Micro Servo: A standard 9g plastic-gear servo motor for actuating the prototype vent.
* Micro Limit Switch (SPDT or SPST): A mechanical switch with a lever arm used to detect when the vent is fully closed.
* Jumper Wires: Female-to-Female or Male-to-Female depending on your breadboard setup.
* Breadboard (Optional but recommended): For secure connections between the ESP32 and peripheral components.
Setup and Connection
Proper wiring is critical. The ESP32 operates at 3.3V logic, but the SG90 servo requires 5V for reliable operation. We will utilize the 5V (or VIN) pin on the ESP32 DevKitC, which draws power directly from the USB connection.
The limit switch will be wired using the ESP32’s internal pull-up resistor. This means we only need to connect the switch between the GPIO pin and Ground. When the switch is unpressed, the pin reads HIGH. When pressed, it connects to Ground and reads LOW.
Pin Mapping Table
| Component | Component Pin / Wire Color | ESP32 DevKitC Pin | Description |
|---|---|---|---|
| SG90 Servo | Brown (or Black) | GND | Common Ground |
| SG90 Servo | Red | 5V / VIN | 5V Power Supply |
| SG90 Servo | Orange (or Yellow) | GPIO 13 | PWM Control Signal |
| Limit Switch | Common (COM) | GND | Common Ground |
| Limit Switch | Normally Open (NO) | GPIO 14 | Digital Input (Active LOW) |
Note on Limit Switch Wiring: Ensure you use the Normally Open (NO) terminal. The circuit is completed (pin goes LOW) only when the vent physically presses the switch arm.
Validated Code
The project requires two files within your PlatformIO project structure: the configuration file (platformio.ini) and the main source code file (src/main.cpp).
platformio.ini
This file configures the build environment, specifies the ESP32 framework, and automatically downloads the required servo library.
[env:esp32dev]
platform = espressif32
board = esp32dev
framework = arduino
monitor_speed = 115200
; We use the widely supported ESP32Servo library by Kevin Harrington
lib_deps =
    madhephaestus/ESP32Servo @ ^3.0.5
src/main.cpp
This file contains the complete logic for the SoftAP WiFi, the web server, the HTML dashboard, and the electromechanical control loop.
Public preview of the validated file. The complete source is shown to members and in PDF/Print.
#include <Arduino.h>
#include <WiFi.h>
#include <WebServer.h>
#include <ESP32Servo.h>
// Pin Definitions
const int SERVO_PIN = 13;
const int LIMIT_SWITCH_PIN = 14;
// Global Objects
Servo ventServo;
WebServer server(80);
// State Variables
int currentAngle = 0;
String ventState = "Closed";
// WiFi Access Point Credentials
const char* ssid = "ESP32-Greenhouse";
const char* password = "password123"; // Minimum 8 characters
// HTML Dashboard (Stored in Flash Memory)
const char index_html[] PROGMEM = R"rawliteral(
<!DOCTYPE html>
<html lang="en">
<head>
<meta charset="UTF-8">
<meta name="viewport" content="width=device-width, initial-scale=1.0">
<title>Greenhouse Vent Controller</title>
<style>
body { font-family: Arial, sans-serif; text-align: center; margin-top: 50px; background-color: #f4f7f6; }
h1 { color: #2c3e50; }
.status { font-size: 1.5em; margin: 20px 0; padding: 10px; background: #fff; border-radius: 8px; display: inline-block; box-shadow: 0 2px 4px rgba(0,0,0,0.1); }
.btn { padding: 15px 30px; font-size: 1.2em; margin: 10px; cursor: pointer; border: none; border-radius: 5px; color: white; transition: background 0.3s; }
.btn-open { background-color: #27ae60; }
.btn-open:hover { background-color: #2ecc71; }
.btn-close { background-color: #c0392b; }
.btn-close:hover { background-color: #e74c3c; }
</style>
<script>
function sendCommand(action) {
document.getElementById("status-text").innerText = "Moving...";
fetch('/' + action)
.then(response => response.text())
.then(state => {
document.getElementById("status-text").innerText = state;
})
.catch(err => {
document.getElementById("status-text").innerText = "Error connecting to ESP32";
});
}
function updateStatus() {
fetch('/status')
.then(response => response.text())
.then(state => {
document.getElementById("status-text").innerText = state;
});
}
// Poll status every 5 seconds to keep dashboard synced
setInterval(updateStatus, 5000);
</script>
</head>
<body onload="updateStatus()">
<h1>Greenhouse Vent Controller</h1>
<div class="status">Current Status: <strong id="status-text">Loading...</strong></div>
<br>
<button class="btn btn-open" onclick="sendCommand('open')">Open Vent (90°)</button>
<button class="btn btn-close" onclick="sendCommand('close')">Close Vent (0°)</button>
</body>
</html>
)rawliteral";
// --- Motor Control Functions ---
void openVent() {
Serial.println("Command Received: Open Vent");
ventState = "Opening...";
// Smooth sweep to 90 degrees
for (int pos = currentAngle; pos <= 90; pos++) {
ventServo.write(pos);
currentAngle = pos;
delay(15);
}
// ...#include <Arduino.h>
#include <WiFi.h>
#include <WebServer.h>
#include <ESP32Servo.h>
// Pin Definitions
const int SERVO_PIN = 13;
const int LIMIT_SWITCH_PIN = 14;
// Global Objects
Servo ventServo;
WebServer server(80);
// State Variables
int currentAngle = 0;
String ventState = "Closed";
// WiFi Access Point Credentials
const char* ssid = "ESP32-Greenhouse";
const char* password = "password123"; // Minimum 8 characters
// HTML Dashboard (Stored in Flash Memory)
const char index_html[] PROGMEM = R"rawliteral(
<!DOCTYPE html>
<html lang="en">
<head>
<meta charset="UTF-8">
<meta name="viewport" content="width=device-width, initial-scale=1.0">
<title>Greenhouse Vent Controller</title>
<style>
body { font-family: Arial, sans-serif; text-align: center; margin-top: 50px; background-color: #f4f7f6; }
h1 { color: #2c3e50; }
.status { font-size: 1.5em; margin: 20px 0; padding: 10px; background: #fff; border-radius: 8px; display: inline-block; box-shadow: 0 2px 4px rgba(0,0,0,0.1); }
.btn { padding: 15px 30px; font-size: 1.2em; margin: 10px; cursor: pointer; border: none; border-radius: 5px; color: white; transition: background 0.3s; }
.btn-open { background-color: #27ae60; }
.btn-open:hover { background-color: #2ecc71; }
.btn-close { background-color: #c0392b; }
.btn-close:hover { background-color: #e74c3c; }
</style>
<script>
function sendCommand(action) {
document.getElementById("status-text").innerText = "Moving...";
fetch('/' + action)
.then(response => response.text())
.then(state => {
document.getElementById("status-text").innerText = state;
})
.catch(err => {
document.getElementById("status-text").innerText = "Error connecting to ESP32";
});
}
function updateStatus() {
fetch('/status')
.then(response => response.text())
.then(state => {
document.getElementById("status-text").innerText = state;
});
}
// Poll status every 5 seconds to keep dashboard synced
setInterval(updateStatus, 5000);
</script>
</head>
<body onload="updateStatus()">
<h1>Greenhouse Vent Controller</h1>
<div class="status">Current Status: <strong id="status-text">Loading...</strong></div>
<br>
<button class="btn btn-open" onclick="sendCommand('open')">Open Vent (90°)</button>
<button class="btn btn-close" onclick="sendCommand('close')">Close Vent (0°)</button>
</body>
</html>
)rawliteral";
// --- Motor Control Functions ---
void openVent() {
Serial.println("Command Received: Open Vent");
ventState = "Opening...";
// Smooth sweep to 90 degrees
for (int pos = currentAngle; pos <= 90; pos++) {
ventServo.write(pos);
currentAngle = pos;
delay(15);
}
    ventState = "Open (90 degrees)";
    Serial.println("Vent is fully open.");
}

void closeVent() {
    Serial.println("Command Received: Close Vent");
    ventState = "Closing...";

    // Smooth sweep towards 0 degrees, monitoring the limit switch
    for (int pos = currentAngle; pos >= 0; pos--) {
        // Check if limit switch is pressed (Active LOW)
        if (digitalRead(LIMIT_SWITCH_PIN) == LOW) {
            Serial.println("Limit switch triggered! Mechanical zero reached.");
            currentAngle = pos; // Update current angle to actual stopped position
            ventState = "Closed (Limit Switch Triggered)";
            return; // Exit the loop immediately
        }

        ventServo.write(pos);
        currentAngle = pos;
        delay(15);
    }

    ventState = "Closed (0 degrees reached without switch)";
    Serial.println("Vent closed to 0 degrees.");
}
// --- Web Server Handlers ---
void handleRoot() {
server.send(200, "text/html", index_html);
}
void handleOpen() {
openVent();
server.send(200, "text/plain", ventState);
}
void handleClose() {
closeVent();
server.send(200, "text/plain", ventState);
}
void handleStatus() {
server.send(200, "text/plain", ventState);
}
// --- Main Setup and Loop ---
void setup() {
Serial.begin(115200);
Serial.println("\n--- ESP32 Greenhouse Vent Controller ---");
// Initialize Limit Switch with internal pull-up
pinMode(LIMIT_SWITCH_PIN, INPUT_PULLUP);
// Initialize Servo
// SG90 requires a 50Hz PWM signal. Standard pulse width is 500us to 2400us.
ventServo.setPeriodHertz(50);
ventServo.attach(SERVO_PIN, 500, 2400);
// Initial calibration: Ensure vent is closed on startup
Serial.println("Performing initial calibration...");
closeVent();
// Setup WiFi Access Point
Serial.println("Starting WiFi Access Point...");
WiFi.softAP(ssid, password);
IPAddress IP = WiFi.softAPIP();
Serial.print("AP IP address: ");
Serial.println(IP);
// Bind Web Server Routes
server.on("/", handleRoot);
server.on("/open", handleOpen);
server.on("/close", handleClose);
server.on("/status", handleStatus);
// Start Web Server
server.begin();
Serial.println("HTTP server started.");
}
void loop() {
// Listen for incoming HTTP requests
server.handleClient();
// Small delay to yield to the underlying RTOS tasks
delay(2);
}
Build, Flash, and Run
To compile the code and upload it to your ESP32 DevKitC, use the PlatformIO Core CLI. You can open a new terminal in VS Code (Terminal -> New Terminal) and execute the following commands.
Command Table
| Action | Command | Purpose |
|---|---|---|
| Build | pio run | Compiles the C++ code and downloads the ESP32Servo library. |
| Flash | pio run --target upload | Uploads the compiled firmware to the connected ESP32. |
| Monitor | pio device monitor | Opens the serial monitor to view IP and debug logs. |
Workflow
- Connect the ESP32 DevKitC to your computer via USB.
- Open the PlatformIO CLI terminal.
- Run
pio runto verify there are no syntax errors and that the library downloads successfully. - Run
pio run --target uploadto flash the device. Note: On some older DevKitC boards, you may need to hold the “BOOT” button when the terminal displaysConnecting.... - Run
pio device monitorto observe the startup sequence and retrieve the SoftAP IP address.
Step-by-step Validation
Follow these grouped checkpoints to verify the system operates according to the objective.
1. Hardware Initialization
- Action: Observe the servo immediately after pressing the
EN(Reset) button on the ESP32. - Expected Observation: The servo should attempt to move towards 0 degrees.
- Pass Condition: The serial monitor outputs “Performing initial calibration…” followed by the completion of the
closeVent()routine.
2. Network Connectivity
- Action: Open the WiFi settings on your smartphone or laptop and scan for networks.
- Expected Observation: A network named
ESP32-Greenhouseis visible. - Pass Condition: You can connect to the network using the password
password123.
3. Dashboard Accessibility
- Action: Open a web browser and navigate to
http://192.168.4.1. - Expected Observation: The “Greenhouse Vent Controller” dashboard loads with two buttons and a status indicator.
- Pass Condition: The status indicator correctly fetches the current state (e.g., “Closed (Limit Switch Triggered)” or “Closed (0 degrees reached without switch)”).
4. Open-Loop Actuation (Opening)
- Action: Click the “Open Vent (90°)” button on the dashboard.
- Expected Observation: The servo sweeps smoothly to the 90-degree position. The dashboard status updates to “Moving…” and then “Open (
Find this product and/or books on this topic on Amazon
As an Amazon Associate, I earn from qualifying purchases. If you buy through this link, you help keep this project running.
Quick Quiz

Telecommunications Electronics Engineer and Computer Engineer (official degrees in Spain).

