
Objective and use case
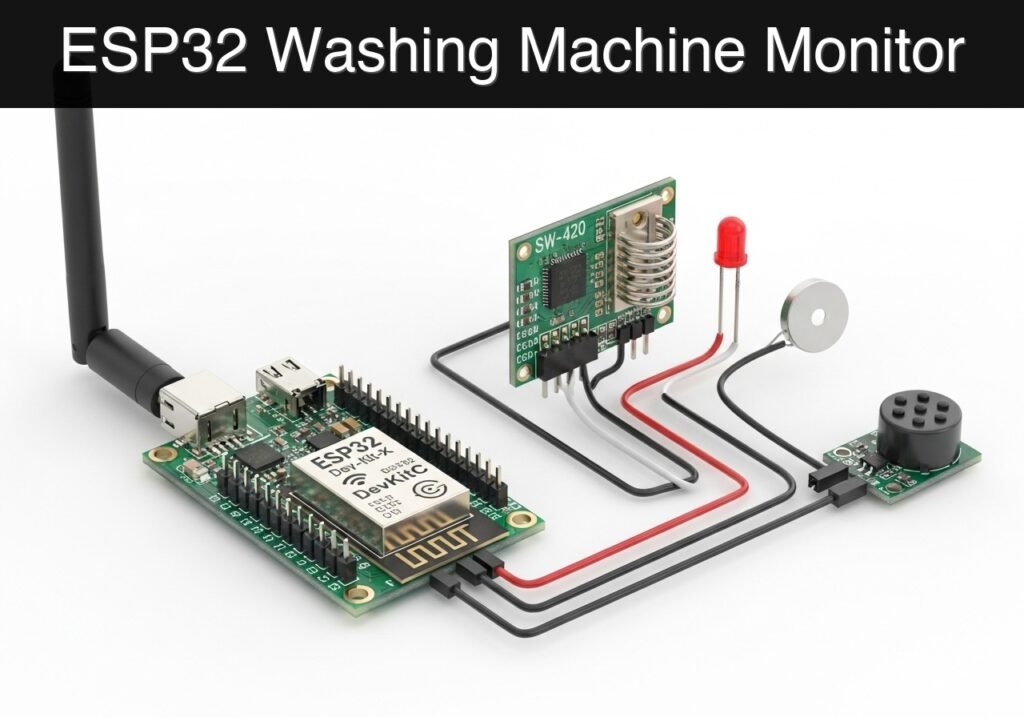
What you’ll build: A non-invasive laundry machine monitor using an ESP32 and SW-420 vibration sensor that detects when a wash cycle finishes. It uses edge-based timeout logic to trigger a local buzzer/LED alarm and a WiFi HTTP alert with sub-second latency.
Why it matters / Use cases
- Prevents forgotten laundry: Provides immediate notifications when the machine stops, preventing mildew and the need for re-washing.
- Optimizes shared facilities: Reduces wait times and unnecessary trips to the laundry room in dorms or apartment buildings.
- Non-invasive monitoring: Safely retrofits onto older “dumb” appliances by relying on external vibrations rather than high-voltage circuitry.
- Edge-based state machine logic: Teaches debouncing and timeout logic to handle normal appliance pauses (e.g., 3-5 minute idle windows between wash, rinse, and spin cycles).
Expected outcome
- A functional ESP32 prototype that reliably detects vibration states and filters out false stops.
- Local audio-visual alerting via a piezo buzzer and status LED.
- A WiFi-triggered HTTP notification delivered in < 500ms when the machine officially completes its cycle.
Audience: IoT hobbyists, electronics students, and home automation enthusiasts; Level: Beginner to Intermediate
Architecture/flow: SW-420 Sensor → ESP32 (Debounce & Timeout State Machine) → Local Piezo/LED & WiFi HTTP POST Alert
Educational validation note
Before publication, this case passed the Prometeo automated validation gate with status PASS. For this ESP32 DevKitC profile, the project was checked as a PlatformIO project: the validator extracted platformio.ini and src/main.cpp, created a temporary project and ran pio run against platform = espressif32, board = esp32dev and framework = arduino. It also checked article structure, copy/paste-safe ASCII command options, and unsupported stacks such as direct ESP-IDF or non-scoped ESP32 boards.
Published validation evidence
- Automatic result: PASS.
- Parsed structure: 3 sections, 3 tables and 2 code blocks detected before publication.
- Checked code: 1 PlatformIO config + 1 ESP32 source/pio run.
- Supported catalog: the article text was checked against Prometeo’s validation-capable device profiles, and unsupported stacks block publication.
- Report findings: no blocking findings.
This validation confirms syntax and tool compatibility for the published code, but it does not replace physical testing on your exact ESP32 DevKitC board, wiring, power supply and local WiFi environment.
Educational safety note
This project is a low-voltage educational prototype, not a certified product. Before powering the setup, verify the pinout of your exact ESP32 DevKitC board, keep GPIO signals within 3.3 V limits, never apply 5 V to ESP32 inputs, disconnect power before changing wiring, and use suitable external supplies for relays, motors or loads while sharing GND only when the schematic requires it.
Conceptual block diagram
High-level view: what enters the system, what each block processes, and what comes out.
Functional architecture
Conceptual flow: moisture detection, local decision and user alert.

Validation path
Conceptual summary of the tools used to check the published ESP32 project.

Prerequisites
Before starting this project, ensure you have the following ready:
* Software Environment: Visual Studio Code (VS Code) with the PlatformIO IDE extension installed.
* Basic C++ Knowledge: Familiarity with variables, if/else statements, and the millis() function for non-blocking delays.
* Network Access: A 2.4GHz WiFi network with known SSID and password credentials.
* USB Drivers: The CP210x or CH34x USB-to-UART drivers installed on your computer (depending on your specific ESP32 DevKitC variant) to allow serial communication and flashing.
Materials
You will need the following exact components for this build:
* ESP32 DevKitC: The core microcontroller, providing both GPIO logic and built-in 2.4GHz WiFi capabilities.
* SW-420 vibration sensor: A digital vibration module featuring an LM393 voltage comparator and a built-in potentiometer for threshold adjustment.
* Piezo buzzer: An active piezo buzzer module (sounds continuously when provided a HIGH digital signal).
* Status LED: A standard 5mm LED (any color, e.g., blue or green) paired with a 220Ω current-limiting resistor.
* Prototyping supplies: A standard breadboard, various male-to-male and male-to-female jumper wires, and a micro-USB cable for programming and power.
Setup/Connection
The SW-420 sensor outputs a digital signal: it remains LOW when still, and pulses HIGH when vibration exceeds the threshold set by its onboard potentiometer. The ESP32 will read this digital pin.
Make the connections according to the following mapping. Ensure your ESP32 is disconnected from USB power while wiring.
| Component | Component Pin | ESP32 DevKitC Pin | Notes |
|---|---|---|---|
| SW-420 Sensor | VCC | 3V3 | Powers the LM393 comparator. |
| SW-420 Sensor | GND | GND | Common ground. |
| SW-420 Sensor | DO (Digital Out) | GPIO 13 | Sends HIGH pulses during vibration. |
| Piezo Buzzer | VCC / + | GPIO 14 | Driven HIGH to sound the alarm. |
| Piezo Buzzer | GND / – | GND | Common ground. |
| Status LED | Anode (Long leg) | GPIO 27 | Connect via a 220Ω resistor. |
| Status LED | Cathode (Short leg) | GND | Common ground. |
Note on Buzzer Current: Standard active piezo buzzers draw around 10-30mA, which is safe to drive directly from an ESP32 GPIO pin (max 40mA per pin). If you are using a larger siren or high-power buzzer, you must use a switching transistor (like a 2N2222) or a relay module.
Validated Code
The following code implements a non-blocking state machine. To test the logic quickly, the cycle timeout is set to 15 seconds. In a real-world deployment, you would increase this to 3-5 minutes to account for the soaking/draining pauses in a washing machine cycle.
Create a new PlatformIO project for the esp32dev board, and replace the contents of the generated files with the code below.
platformio.ini
[env:esp32dev]
platform = espressif32
board = esp32dev
framework = arduino
monitor_speed = 115200
src/main.cpp
Public preview of the validated file. The complete source is shown to members and in PDF/Print.
#include <Arduino.h>
#include <WiFi.h>
#include <HTTPClient.h>

// ---------------------------------------------------------
// Configuration: WiFi & Webhook
// ---------------------------------------------------------
const char* WIFI_SSID = "YOUR_WIFI_SSID";
const char* WIFI_PASSWORD = "YOUR_WIFI_PASSWORD";

// For demonstration, we use httpbin.org to echo the GET request.
// In a real application, replace this with an IFTTT Webhook,
// Home Assistant endpoint, or custom API URL.
const char* WEBHOOK_URL = "http://httpbin.org/get?laundry=finished";

// ---------------------------------------------------------
// Configuration: Hardware Pins
// ---------------------------------------------------------
const int SW420_PIN = 13;
const int BUZZER_PIN = 14;
const int LED_PIN = 27;

// ---------------------------------------------------------
// Configuration: Timing & State Machine
// ---------------------------------------------------------
// Time required without vibration to consider the cycle "finished".
// Set to 15 seconds (15000ms) for testing.
// For real laundry machines, use 180000ms (3 minutes) or more.
const unsigned long CYCLE_TIMEOUT_MS = 15000;

enum MachineState {
    STATE_IDLE,
    STATE_RUNNING,
    STATE_FINISHED
};

MachineState currentState = STATE_IDLE;
unsigned long lastVibrationTime = 0;
unsigned long lastAlertToggleTime = 0;
bool alertToggleState = false;

// Function prototypes
void connectToWiFi();
void sendWiFiAlert();
void handleAlertHardware();

void setup() {
    Serial.begin(115200);
    delay(1000);
    Serial.println("\n--- Laundry Vibration WiFi Alert ---");

    // Initialize pins
    pinMode(SW420_PIN, INPUT);
    pinMode(BUZZER_PIN, OUTPUT);
    pinMode(LED_PIN, OUTPUT);

    // Ensure outputs are off initially
    digitalWrite(BUZZER_PIN, LOW);
    digitalWrite(LED_PIN, LOW);

    connectToWiFi();

    Serial.println("System initialized. Waiting for vibration...");
}

void loop() {
    unsigned long currentMillis = millis();
    int vibrationDetected = digitalRead(SW420_PIN);

    // 1. Read Sensor & Update Timers
    if (vibrationDetected == HIGH) {
        lastVibrationTime = currentMillis;

        // If we were idle or already finished, a new vibration means a cycle is starting/restarting
        if (currentState == STATE_IDLE || currentState == STATE_FINISHED) {
            currentState = STATE_RUNNING;
            Serial.println("STATUS: Machine is now RUNNING.");
            // Ensure alert hardware is turned off when returning to running
            digitalWrite(BUZZER_PIN, LOW);
            digitalWrite(LED_PIN, HIGH); // Solid LED indicates running
        }
    }
// ...#include <Arduino.h>
#include <WiFi.h>
#include <HTTPClient.h>
// ---------------------------------------------------------
// Configuration: WiFi & Webhook
// ---------------------------------------------------------
const char* WIFI_SSID = "YOUR_WIFI_SSID";
const char* WIFI_PASSWORD = "YOUR_WIFI_PASSWORD";
// For demonstration, we use httpbin.org to echo the GET request.
// In a real application, replace this with an IFTTT Webhook,
// Home Assistant endpoint, or custom API URL.
const char* WEBHOOK_URL = "http://httpbin.org/get?laundry=finished";
// ---------------------------------------------------------
// Configuration: Hardware Pins
// ---------------------------------------------------------
const int SW420_PIN = 13;
const int BUZZER_PIN = 14;
const int LED_PIN = 27;
// ---------------------------------------------------------
// Configuration: Timing & State Machine
// ---------------------------------------------------------
// Time required without vibration to consider the cycle "finished".
// Set to 15 seconds (15000ms) for testing.
// For real laundry machines, use 180000ms (3 minutes) or more.
const unsigned long CYCLE_TIMEOUT_MS = 15000;
enum MachineState {
STATE_IDLE,
STATE_RUNNING,
STATE_FINISHED
};
MachineState currentState = STATE_IDLE;
unsigned long lastVibrationTime = 0;
unsigned long lastAlertToggleTime = 0;
bool alertToggleState = false;
// Function prototypes
void connectToWiFi();
void sendWiFiAlert();
void handleAlertHardware();
void setup() {
Serial.begin(115200);
delay(1000);
Serial.println("\n--- Laundry Vibration WiFi Alert ---");
// Initialize pins
pinMode(SW420_PIN, INPUT);
pinMode(BUZZER_PIN, OUTPUT);
pinMode(LED_PIN, OUTPUT);
// Ensure outputs are off initially
digitalWrite(BUZZER_PIN, LOW);
digitalWrite(LED_PIN, LOW);
connectToWiFi();
Serial.println("System initialized. Waiting for vibration...");
}
void loop() {
unsigned long currentMillis = millis();
int vibrationDetected = digitalRead(SW420_PIN);
// 1. Read Sensor & Update Timers
if (vibrationDetected == HIGH) {
lastVibrationTime = currentMillis;
// If we were idle or already finished, a new vibration means a cycle is starting/restarting
if (currentState == STATE_IDLE || currentState == STATE_FINISHED) {
currentState = STATE_RUNNING;
Serial.println("STATUS: Machine is now RUNNING.");
// Ensure alert hardware is turned off when returning to running
digitalWrite(BUZZER_PIN, LOW);
digitalWrite(LED_PIN, HIGH); // Solid LED indicates running
}
}
    // 2. Evaluate State Machine
    if (currentState == STATE_RUNNING) {
        // Check if the timeout has elapsed since the last detected vibration
        if (currentMillis - lastVibrationTime > CYCLE_TIMEOUT_MS) {
            currentState = STATE_FINISHED;
            Serial.println("STATUS: Cycle FINISHED! Triggering alerts.");
            digitalWrite(LED_PIN, LOW); // Turn off solid LED
            sendWiFiAlert();
        }
    }

    // 3. Handle Hardware Outputs based on State
    if (currentState == STATE_FINISHED) {
        handleAlertHardware();
    } else if (currentState == STATE_IDLE) {
        // Optional: Pulse LED slowly to show system is alive but idle
        digitalWrite(LED_PIN, (currentMillis / 1000) % 2 == 0);
    }

    // Small delay to prevent tight-loop debouncing issues
    delay(50);
}

// ---------------------------------------------------------
// Helper Functions
// ---------------------------------------------------------
void connectToWiFi() {
Serial.print("Connecting to WiFi: ");
Serial.println(WIFI_SSID);
WiFi.mode(WIFI_STA);
WiFi.begin(WIFI_SSID, WIFI_PASSWORD);
int attempts = 0;
while (WiFi.status() != WL_CONNECTED && attempts < 20) {
delay(500);
Serial.print(".");
attempts++;
}
if (WiFi.status() == WL_CONNECTED) {
Serial.println("\nWiFi connected.");
Serial.print("IP Address: ");
Serial.println(WiFi.localIP());
} else {
Serial.println("\nFailed to connect to WiFi. Continuing offline.");
}
}
void sendWiFiAlert() {
if (WiFi.status() == WL_CONNECTED) {
HTTPClient http;
Serial.print("Sending HTTP GET to: ");
Serial.println(WEBHOOK_URL);
http.begin(WEBHOOK_URL);
int httpResponseCode = http.GET();
if (httpResponseCode > 0) {
Serial.print("HTTP Response code: ");
Serial.println(httpResponseCode);
} else {
Serial.print("Error code: ");
Serial.println(httpResponseCode);
}
http.end();
} else {
Serial.println("WiFi disconnected. Cannot send webhook alert.");
}
}
void handleAlertHardware() {
// Non-blocking toggle for Buzzer and LED (beep every 500ms)
unsigned long currentMillis = millis();
if (currentMillis - lastAlertToggleTime >= 500) {
lastAlertToggleTime = currentMillis;
alertToggleState = !alertToggleState;
digitalWrite(BUZZER_PIN, alertToggleState ? HIGH : LOW);
digitalWrite(LED_PIN, alertToggleState ? HIGH : LOW);
}
}
Build/Flash/Run commands
Use the PlatformIO Core CLI to compile, upload, and monitor the project. Open the integrated terminal in VS Code and execute the following commands.
| Command | Purpose |
|---|---|
pio run | Compiles the C++ source code and checks for syntax errors. |
pio run --target upload | Flashes the compiled firmware to the connected ESP32 over USB. |
pio device monitor | Opens the serial monitor to view the ESP32’s console output. |
Execution Workflow:
1. Update WIFI_SSID and WIFI_PASSWORD in src/main.cpp with your actual network credentials.
2. Connect the ESP32 DevKitC to your computer via micro-USB.
3. Run pio run to verify the code compiles successfully.
4. Run pio run --target upload to flash the device. (If the upload fails to start, press and hold the “BOOT” button on the ESP32 until the flashing progress percentage appears).
5. Run pio device monitor to observe the boot sequence, WiFi connection, and sensor states.
Step-by-step Validation
Follow these checkpoints to ensure your prototype functions correctly.
- Boot and WiFi Connection
- Observation: Watch the serial monitor after resetting the ESP32.
- Pass condition: The console displays “Connecting to WiFi…”, followed by “WiFi connected.” and an assigned IP address.
- Idle State Verification
- Observation: Leave the sensor completely still on your desk.
- Pass condition: The serial monitor says “System initialized. Waiting for vibration…” and the status LED blinks slowly (1Hz). No buzzer sounds.
- Vibration Detection (Running State)
- Observation: Tap the SW-420 sensor gently with your finger or tap the table it rests on.
- Pass condition: The serial monitor immediately prints “STATUS: Machine is now RUNNING.” The status LED turns solid ON.
- Cycle Completion (Timeout & Alert)
- Observation: Stop tapping and wait for exactly 15 seconds (the
CYCLE_TIMEOUT_MS). - Pass condition: The serial monitor prints “STATUS: Cycle FINISHED! Triggering alerts.” The LED and buzzer begin pulsing on and off every 500ms.
- Observation: Stop tapping and wait for exactly 15 seconds (the
- Webhook/Network Verification
- Observation: Immediately after the timeout, observe the HTTP output in the serial monitor.
- Pass condition: The console prints “Sending HTTP GET…” followed by “HTTP Response code: 200”. This confirms the ESP32 successfully reached the external server.
Troubleshooting
| Symptom | Likely cause | Fix |
|---|---|---|
| WiFi fails to connect | Incorrect credentials or 5GHz network. | Verify SSID/Password. Ensure your router is broadcasting a 2.4GHz band (ESP32 does not support 5GHz). |
| Sensor always triggers (No timeout) | SW-420 sensitivity is set too high. | Turn the blue potentiometer on the SW-420 module counter-clockwise to reduce sensitivity until the onboard green LED turns off when still. |
| Sensor never triggers | SW-420 sensitivity is set too low. | Turn the potentiometer clockwise until it triggers easily upon tapping the table. |
| Buzzer does not sound | Polarity reversed or wrong pin. | Ensure the longer leg (or + mark) of the buzzer goes to GPIO 14, and the other to GND. |
| HTTP Response code is -1 | DNS failure or lack of internet. | Verify the ESP32 is connected to a network with active internet access, not just a local router without WAN. |
Improvements
Once the basic prototype is working, consider these enhancements for a permanent deployment:
Hardware Robustness:
* Enclosure and Mounting: Place the ESP32 in a 3D-printed case. Attach neodymium magnets to the back of the case so it can snap securely onto the metal chassis of the washing machine, ensuring excellent vibration transfer to the SW-420.
* Passive Buzzer / Audio: Swap the active buzzer for a passive buzzer. You can then use the ESP32’s PWM capabilities (ledcWrite) to play a pleasant melody (like a classic appliance chime) instead of a harsh beep.
Software and Logic:
* Realistic Timeouts: Increase CYCLE_TIMEOUT_MS to 180,000 (3 minutes) to account for the soaking and draining phases where a washing machine is temporarily completely still.
* MQTT Integration: Replace the basic HTTP GET request with an MQTT client (using the PubSubClient library) to integrate seamlessly with Home Assistant, Node-RED, or OpenHAB.
* Deep Sleep / Low Power: If running on a LiPo battery, modify the code to enter ESP32 Deep Sleep. You can use the SW-420 pin as an external wake
Find this product and/or books on this topic on Amazon
As an Amazon Associate, I earn from qualifying purchases. If you buy through this link, you help keep this project running.
Quick Quiz

Telecommunications Electronics Engineer and Computer Engineer (official degrees in Spain).

