
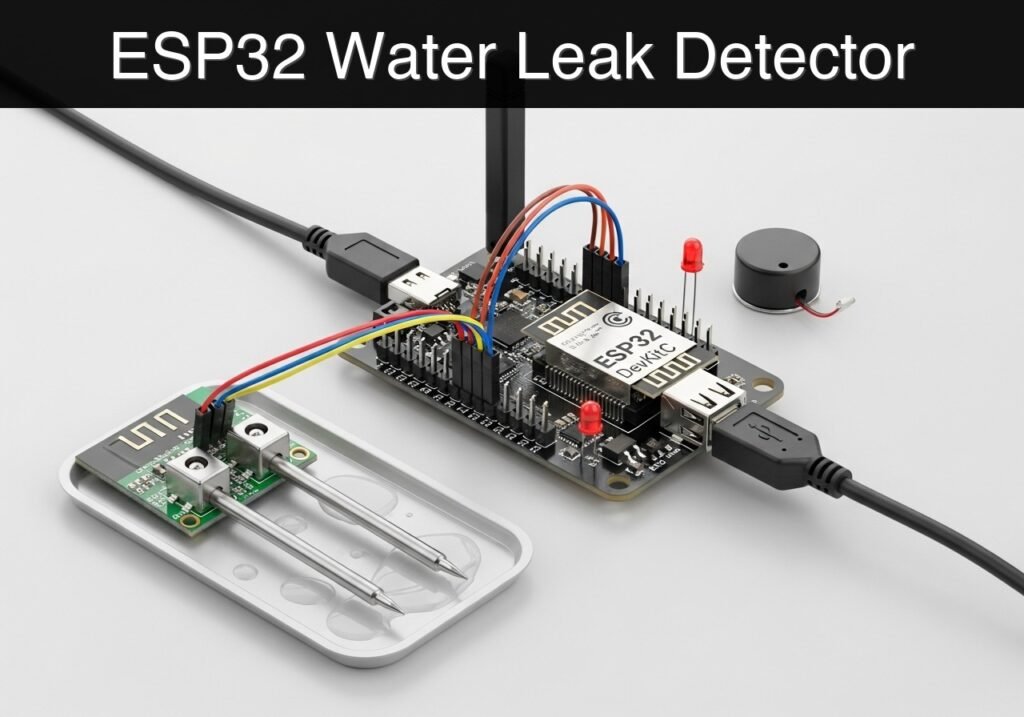
case-device-block-diagram, What you’ll build: A smart, WiFi-enabled water leak detection prototype that triggers an immediate local audio-visual alarm while hosting a live web dashboard and JSON API to report its status over the local network. Audience: IoT Developers, Smart Home Enthusiasts; Level: Intermediate Architecture/flow: Analog/Digital Water Sensor → ESP32 GPIO → Local Hardware Alarm (Buzzer/LED) + Asynchronous Web Server → JSON API / Live Dashboard High-level view: what enters the system, what each block processes, and what comes out. Conceptual flow: moisture detection, local decision and user alert. Conceptual summary of the tools used to check the published ESP32 project. Before publication, this case passed the Prometeo automated validation gate with status PASS. For this ESP32 DevKitC profile, the project was checked as a PlatformIO project: the validator extracted This validation confirms syntax and tool compatibility for the published code, but it does not replace physical testing on your exact ESP32 DevKitC board, wiring, power supply and local WiFi environment. Electrical and water hazard: this project interacts with water and must remain a low-voltage educational prototype. Do not place it near exposed outlets or 110/220 V wiring, power the ESP32 DevKitC from USB or an isolated battery, keep GPIO signals at 3.3 V, and always disconnect power before handling sensors, changing wires, or moving the device. To successfully complete this tutorial, you will need: You will need the following hardware components. Ensure you are using the exact device model specified. Carefully wire the components on your breadboard according to the table below. Make sure the ESP32 is unplugged from your computer while making connections. Hardware Note: Active buzzers generate their own tone when a simple HIGH signal is applied. Do not confuse this with a passive buzzer, which requires a PWM (Pulse Width Modulation) signal to generate sound. We are using an active buzzer for simplicity. Create a new project in PlatformIO, selecting the Espressif ESP32 Dev Module as your board and Arduino as the framework. Replace the contents of the auto-generated files with the code below. This file configures the PlatformIO build environment, specifying the board, framework, and serial monitor speed. This is the main application code. It implements a non-blocking state machine to flash the LED and pulse the buzzer without interrupting the WiFi web server. Important: Replace Public preview of the validated file. The complete source is shown to members and in PDF/Print. Use the PlatformIO Core CLI (or the integrated terminal in VS Code) to execute the following commands. Workflow: Follow these checkpoints to verify the system functions exactly as intended. Once you have mastered the basic prototype, consider these architectural enhancements: Find this product and/or books on this topic on Amazon As an Amazon Associate, I earn from qualifying purchases. If you buy through this link, you help keep this project running.
.prometeo-educational-note,
.prometeo-device-postcode-section,
.prometeo-device-section-card {
margin: 2.4rem 0;
padding: 1.45rem 1.55rem;
border: 1px solid rgba(148, 163, 184, 0.30);
border-radius: 14px;
background:
linear-gradient(135deg, rgba(30, 41, 59, 0.50), rgba(15, 23, 42, 0.18)),
rgba(17, 24, 39, 0.48);
box-shadow: 0 18px 48px rgba(0, 0, 0, 0.20);
}
.case-objective > h2:first-of-type,
.case-device-block-diagram > h2:first-of-type,
.prometeo-device-postcode-section > h2:first-of-type,
.prometeo-device-section-card > h2:first-of-type {
margin-top: 0;
}
.prometeo-device-section-card > :last-child,
.case-objective > :last-child,
.case-device-block-diagram > :last-child,
.prometeo-device-postcode-section > :last-child {
margin-bottom: 0;
}
.prometeo-device-section-card.prometeo-device-section-card-code {
border-left: 4px solid rgba(56, 189, 248, 0.86);
background:
linear-gradient(135deg, rgba(8, 47, 73, 0.42), rgba(15, 23, 42, 0.18)),
rgba(15, 23, 42, 0.58);
}
.prometeo-device-section-card.prometeo-device-section-card-compact {
padding: 1.2rem 1.35rem;
}
.prometeo-device-section-card pre,
.case-objective pre,
.case-device-block-diagram pre,
.prometeo-device-postcode-section pre {
max-width: 100%;
}
.prometeo-device-postcode-section .prometeo-device-flow-item {
background:
linear-gradient(135deg, rgba(15, 23, 42, 0.50), rgba(30, 41, 59, 0.28)),
rgba(15, 23, 42, 0.28);
}
@media print {
.case-objective,
.case-device-block-diagram,
.prometeo-educational-note,
.prometeo-device-postcode-section,
.prometeo-device-section-card {
background: #fff;
color: #111827;
box-shadow: none;
break-inside: avoid;
page-break-inside: avoid;
}
}
Objective and use case
Why it matters / Use cases
Expected outcome
Conceptual block diagram
Functional architecture
Validation path
Educational validation note
platformio.ini and src/main.cpp, created a temporary project and ran pio run against platform = espressif32, board = esp32dev and framework = arduino. It also checked article structure, copy/paste-safe ASCII command options, and unsupported stacks such as direct ESP-IDF or non-scoped ESP32 boards.Published validation evidence
Educational safety note
Prerequisites
* Software: Visual Studio Code with the PlatformIO IDE extension installed.
* Knowledge: Basic understanding of C++ syntax, fundamental digital logic (HIGH/LOW states), and how to connect to a 2.4GHz WiFi network.
* System: A computer with an available USB port and the appropriate USB-to-UART drivers installed (CP210x or CH34x, depending on your specific ESP32 DevKitC variant).Materials
Component Description / Specification Quantity ESP32 DevKitC Standard 38-pin or 30-pin ESP32 development board. 1 Water leak sensor Digital or analog water sensor module (e.g., standard analog/digital comparator module with exposed trace probes). We will use the digital output (DO) pin. 1 Active buzzer 3.3V or 5V active buzzer module (sounds continuously when provided a DC voltage). 1 Status LED Standard 5mm LED (Red or Yellow preferred for alerts). 1 Resistor 220-ohm resistor for the status LED to limit current. 1 Breadboard Standard half-size or full-size breadboard for prototyping. 1 Jumper Wires Assorted male-to-male and female-to-male Dupont wires. 1 set Micro-USB Cable Data-capable USB cable for programming and power. 1 Setup/Connection
Pinout Mapping
ESP32 DevKitC Pin Component Component Pin Notes 3V3 Water Leak Sensor VCC Powers the sensor logic. GND Water Leak Sensor GND Common ground. GPIO 32 Water Leak Sensor DO (Digital Out) Pulled LOW or HIGH depending on the module when water is detected. (Code assumes HIGH on leak, adjust if your module is active-LOW). 3V3 / 5V Active Buzzer VCC Powers the buzzer. Check your buzzer’s voltage rating. GND Active Buzzer GND Common ground. GPIO 26 Active Buzzer I/O (Signal) Triggers the buzzer when set to HIGH. GPIO 27 Status LED Anode (Long leg) Connect via the 220-ohm resistor. GND Status LED Cathode (Short leg) Common ground. Validated Code
platformio.ini
[env:esp32dev]
platform = espressif32
board = esp32dev
framework = arduino
monitor_speed = 115200
src/main.cpp
YOUR_WIFI_SSID and YOUR_WIFI_PASSWORD with your actual 2.4GHz network credentials.#include <Arduino.h>
#include <WiFi.h>
#include <WebServer.h>
// ---------------------------------------------------------
// Network Credentials
// ---------------------------------------------------------
const char* ssid = "YOUR_WIFI_SSID";
const char* password = "YOUR_WIFI_PASSWORD";
// ---------------------------------------------------------
// Pin Definitions
// ---------------------------------------------------------
const int SENSOR_PIN = 32; // Digital input from water sensor
const int BUZZER_PIN = 26; // Output to active buzzer
const int LED_PIN = 27; // Output to status LED
// ---------------------------------------------------------
// Global State Variables
// ---------------------------------------------------------
bool isLeakDetected = false;
// Non-blocking timing variables for the alarm
unsigned long previousMillis = 0;
const long alarmInterval = 500; // Blink/Beep interval in milliseconds
bool alarmState = false;
// ---------------------------------------------------------
// Web Server Initialization (Port 80)
// ---------------------------------------------------------
WebServer server(80);
// Function to generate the HTML dashboard
void handleRoot() {
String html = "<!DOCTYPE html><html><head>";
html += "<meta name=\"viewport\" content=\"width=device-width, initial-scale=1\">";
// Auto-refresh the page every 5 seconds
html += "<meta http-equiv=\"refresh\" content=\"5\">";
html += "<title>Water Leak Monitor</title>";
html += "<style>";
html += "body { font-family: Arial, sans-serif; text-align: center; margin-top: 50px; background-color: #f4f4f9; }";
html += "h1 { color: #333; }";
html += ".status-box { display: inline-block; padding: 40px; border-radius: 10px; font-size: 24px; font-weight: bold; color: white; }";
html += ".dry { background-color: #4CAF50; }"; // Green for safe
html += ".leak { background-color: #F44336; animation: blinker 1s linear infinite; }"; // Red for danger
html += "@keyframes blinker { 50% { opacity: 0.5; } }";
html += "</style></head><body>";
html += "<h1>ESP32 Water Leak Monitor</h1>";
if (isLeakDetected) {
html += "<div class=\"status-box leak\">WARNING: LEAK DETECTED!</div>";
html += "<p>Water has been detected by the sensor.</p>";
} else {
html += "<div class=\"status-box dry\">STATUS: DRY</div>";
html += "<p>No water detected. System normal.</p>";
}
html += "</body></html>";
server.send(200, "text/html", html);
}
// Function to provide a JSON API endpoint for smart home integration
void handleStatusJSON() {
String json = "{";
json += "\"leak\": " + String(isLeakDetected ? "true" : "false") + ",";
json += "\"system\": \"ESP32-DevKitC\"";
json += "}";
server.send(200, "application/json", json);
}
// ...#include <Arduino.h>
#include <WiFi.h>
#include <WebServer.h>
// ---------------------------------------------------------
// Network Credentials
// ---------------------------------------------------------
const char* ssid = "YOUR_WIFI_SSID";
const char* password = "YOUR_WIFI_PASSWORD";
// ---------------------------------------------------------
// Pin Definitions
// ---------------------------------------------------------
const int SENSOR_PIN = 32; // Digital input from water sensor
const int BUZZER_PIN = 26; // Output to active buzzer
const int LED_PIN = 27; // Output to status LED
// ---------------------------------------------------------
// Global State Variables
// ---------------------------------------------------------
bool isLeakDetected = false;
// Non-blocking timing variables for the alarm
unsigned long previousMillis = 0;
const long alarmInterval = 500; // Blink/Beep interval in milliseconds
bool alarmState = false;
// ---------------------------------------------------------
// Web Server Initialization (Port 80)
// ---------------------------------------------------------
WebServer server(80);
// Function to generate the HTML dashboard
void handleRoot() {
String html = "<!DOCTYPE html><html><head>";
html += "<meta name=\"viewport\" content=\"width=device-width, initial-scale=1\">";
// Auto-refresh the page every 5 seconds
html += "<meta http-equiv=\"refresh\" content=\"5\">";
html += "<title>Water Leak Monitor</title>";
html += "<style>";
html += "body { font-family: Arial, sans-serif; text-align: center; margin-top: 50px; background-color: #f4f4f9; }";
html += "h1 { color: #333; }";
html += ".status-box { display: inline-block; padding: 40px; border-radius: 10px; font-size: 24px; font-weight: bold; color: white; }";
html += ".dry { background-color: #4CAF50; }"; // Green for safe
html += ".leak { background-color: #F44336; animation: blinker 1s linear infinite; }"; // Red for danger
html += "@keyframes blinker { 50% { opacity: 0.5; } }";
html += "</style></head><body>";
html += "<h1>ESP32 Water Leak Monitor</h1>";
if (isLeakDetected) {
html += "<div class=\"status-box leak\">WARNING: LEAK DETECTED!</div>";
html += "<p>Water has been detected by the sensor.</p>";
} else {
html += "<div class=\"status-box dry\">STATUS: DRY</div>";
html += "<p>No water detected. System normal.</p>";
}
html += "</body></html>";
server.send(200, "text/html", html);
}
// Function to provide a JSON API endpoint for smart home integration
void handleStatusJSON() {
String json = "{";
json += "\"leak\": " + String(isLeakDetected ? "true" : "false") + ",";
json += "\"system\": \"ESP32-DevKitC\"";
json += "}";
server.send(200, "application/json", json);
}
// ---------------------------------------------------------
// Setup Function
// ---------------------------------------------------------
void setup() {
    // Initialize Serial Monitor
    Serial.begin(115200);
    delay(1000);
    Serial.println("\nInitializing Water Leak Monitor...");

    // Configure GPIO Pins
    pinMode(SENSOR_PIN, INPUT_PULLDOWN); // Ensure pin doesn't float
    pinMode(BUZZER_PIN, OUTPUT);
    pinMode(LED_PIN, OUTPUT);

    // Ensure alarm is off at boot
    digitalWrite(BUZZER_PIN, LOW);
    digitalWrite(LED_PIN, LOW);

    // Connect to WiFi
    Serial.print("Connecting to WiFi network: ");
    Serial.println(ssid);
    WiFi.begin(ssid, password);

    while (WiFi.status() != WL_CONNECTED) {
        delay(500);
        Serial.print(".");
    }
Serial.println("\nWiFi connected successfully!");
Serial.print("IP Address: ");
Serial.println(WiFi.localIP());
// Define Web Server Routes
server.on("/", handleRoot);
server.on("/status", handleStatusJSON);
// Start the Web Server
server.begin();
Serial.println("HTTP server started.");
}
// ---------------------------------------------------------
// Main Loop
// ---------------------------------------------------------
void loop() {
// 1. Handle incoming HTTP client requests
server.handleClient();
// 2. Read the water sensor
// Note: Adjust logic if your sensor module is active-LOW (e.g., reads LOW when wet)
int sensorValue = digitalRead(SENSOR_PIN);
if (sensorValue == HIGH) {
if (!isLeakDetected) {
Serial.println("ALERT: Water Leak Detected!");
isLeakDetected = true;
}
} else {
if (isLeakDetected) {
Serial.println("INFO: Sensor is dry. System normalized.");
isLeakDetected = false;
// Immediately shut off alarm outputs when dry
digitalWrite(LED_PIN, LOW);
digitalWrite(BUZZER_PIN, LOW);
}
}
// 3. Handle non-blocking local alarm (LED and Buzzer)
if (isLeakDetected) {
unsigned long currentMillis = millis();
if (currentMillis - previousMillis >= alarmInterval) {
previousMillis = currentMillis;
// Toggle the alarm state
alarmState = !alarmState;
// Update hardware pins
digitalWrite(LED_PIN, alarmState ? HIGH : LOW);
digitalWrite(BUZZER_PIN, alarmState ? HIGH : LOW);
}
}
}
Build/Flash/Run commands
Command Purpose pio runCompiles the project to ensure there are no syntax errors. pio run --target uploadCompiles and flashes the firmware to the ESP32 over USB. pio device monitorOpens the serial monitor to view log outputs and find the IP address.
1. Open the PlatformIO terminal.
2. Run pio run to verify your code compiles successfully.
3. Connect your ESP32 DevKitC via USB.
4. Run pio run --target upload. (If the upload fails to connect, you may need to hold the “BOOT” button on the ESP32 while the terminal says “Connecting…”).
5. Run pio device monitor to observe the boot sequence, verify WiFi connection, and obtain the assigned IP address.Step-by-step Validation
pio run.SUCCESS with no compilation errors.pio device monitor and press the EN (Reset) button on the ESP32.192.168.1.50)./) HTTP requests.http://<IP_ADDRESS>/status./status endpoint returns {"leak": true, "system": "ESP32-DevKitC"}.Troubleshooting
Symptom Likely cause Fix Code fails to upload (Timeout) ESP32 is not entering bootloader mode automatically. Hold the “BOOT” button on the DevKitC when the console displays “Connecting…”. Release it once uploading begins. Cannot connect to WiFi (Endless dots) Incorrect SSID/Password, or trying to connect to a 5GHz network. Verify credentials in main.cpp. Ensure your router is broadcasting a 2.4GHz band (ESP32 does not support 5GHz).Sensor triggers when dry (False Positives) Floating input pin or extreme humidity. Ensure INPUT_PULLDOWN is set in code. Adjust the potentiometer on the sensor module (if equipped) to decrease sensitivity.Buzzer makes a clicking sound, not a tone You are using a passive buzzer instead of an active buzzer. Replace with an active buzzer, or rewrite the digitalWrite logic to use tone() or ledcWrite() for PWM generation.Web page is slow to load or times out Blocking code ( delay()) is halting the web server loop.Ensure you are using the millis() logic provided in the Validated Code section. Do not use delay() inside the main loop().Improvements
esp_sleep_enable_ext0_wakeup).PubSubClient.h) to push alerts to a central Home Assistant broker rather than relying on a pull-based web server.


Quick Quiz

Telecommunications Electronics Engineer and Computer Engineer (official degrees in Spain).

